Showing posts with label italian. Show all posts

Monday, April 11, 2011

The Crispiest Batter

Well, compared to last night's meal, this was a piece of cake! And thank goodness for that, because while I may have the week off from work for a little "stay-cation," it's not at all what you think! We have a new 8-week old puppy, and we are using this week to bond with her. Her name is Oia (pronounced Ee-Ah) and she is most definitely the cutest thing I've ever seen. She's a lot of work though! It's a wonder I've found time to cook dinners! That lasagna came in very handy for our lunch today!

This easy recipe was quite welcome this evening! Easy but DELICIOUS! This recipe is for Italian Style Fish with the Crispiest Batter, and I served an Amalfi salad alongside it. This was a refreshing yet comforting meal that went perfectly with a cold beer after a long day of running around with an energetic bundle of fur!

For my mise en place, I gathered a cod fillet, some sea salt, lemon juice and zest, sunflower oil, a couple of egg yolks, flour, olive oil, some "fizzy water," and some lemon halves for serving.

IMG_0503

The first step was to season the cod with lots of salt and some lemon juice. You can be generous with the salt because we're going to use it to get the moisture out of the fish. Once I massaged the salt and lemon juice into the fillet, I put it on a plate and placed it in the fridge for half an hour. When I pulled the fish out of the fridge, there was a lot of liquid on the plate that I poured off, and dried the fillet with some paper towels.

While the fish rested, I made my Amalfi Salad (with radishes, red onion, cucumber, fennel, orange slices and a nice red wine vinaigrette) and then went to work on the batter for the fish. I put the flour, egg yolks, lemon zest and a glug of olive oil into a bowl and stirred it all up. Once that's blended, start pouring the "fizzy water" into the mixture slowly, stirring to combine as you pour. Once the batter has a custard-y consistency, and coats the back of a spoon, you're ready to go!

IMG_0505

Once my fillet was ready, and dried, I cut it into four smaller pieces and coated them in flour. We coat the fish in flour before the batter so that the batter has something to stick to!

IMG_0506

Meanwhile, I was heating sunflower oil in a cast iron pan. I added a small piece of potato to the oil, and as it came to the right temperature, the potato started to fry.

IMG_0507

Once the oil was the right temperature, I placed each piece of the cod fillet into the batter and then used the sides of the bowl to smooth out the layer of batter so it didn't get clumpy. As I coated each piece, I placed them in the oil for about 4 minutes, until they are golden and crispy!

IMG_0509

Once the four minutes were up, I drained the crispy fish on some paper towels, and plated them along with some of the Amalfi Salad. The batter was very reminiscent of tempura and it really was "the crispiest!"

IMG_0510

Sunday, April 3, 2011

Dolci means Dessert!

Happy Sunday everyone! In the midst of my weekend duties of laundry and cleaning, I decided it was high time I made an Italian dessert to complement this menu of delicacies of the same cuisine. I opted for one I didn't actually have to cook - because we all know how baking and I get along...not well. The perfect choice - TIRAMISU. This quick take on very traditional Italian dessert was so easy to make and looks SO delicious! I can't wait to try some after dinner!

First off, I got my mise en place together, and like most baking recipes, it was more measuring than any other prep work so it went fairly quickly. Ladyfingers, coffee, sugar, mascarpone, vanilla beans, sweet sherry, an orange (for the zest and the juice) and some 70% dark chocolate, and I was ready to go!

IMG_0440

I got myself an 8-inch square dish and layered my ladyfingers in an orderly fashion. The recipe called for 15 biscuits...and there were 20 in my package, so I just used them all to complete my second layer.

IMG_0441

Once I had my ladyfingers in place, I poured my freshly brewed cup of coffee (sweetened with some of the sugar) over them. Immediately, the cookies started to soak up the coffee.

IMG_0442

While I left them to get all soggy and delicious, I put my mascarpone in a bowl with the rest of the sugar and whipped it up.

IMG_0443

Once that was nicely blended, I split the two vanilla beans by scoring them the long way and used a small coffee spoon to scrape all the seeds out of each pod.

IMG_0444

I added the seeds to the bowl of whipped mascarpone and continued to whisk. The vanilla seeds separated into tiny little black specks when I whisked it. Look at all the little vanilla seeds!

IMG_0445

I then whisked in the 1/2 cup of sweet sherry and the mascarpone mixture was finished. Once the sherry has been blended, the mixture should have a loose, shiny consistency. If for some reason you should need to loosen the mixture a bit more before you pour it on your ladyfingers, you can use some of the orange juice to do so. Then the squeeze the rest of the orange juice over the ladyfingers and spread the whipped mascarpone mixture evenly on top.

IMG_0446

Once you've got that all spread out evenly, sprinkle shaved chocolate over the entire surface, along with some orange zest, and VOILA...TIRAMISU!

IMG_0447

Doesn't that look mouth-watering? It's going to be very difficult to keep that in the fridge until after dinner. Wish me luck! :)

Friday, April 1, 2011

Rotolo di Zucca e Ricotta

Well, this recipe certainly was a bit of work - but it was SO worth it. This dish is so pretty, and wonderful for impressing those dinner party guests. It's a lot of work, but the work isn't all that difficult. I love how Jamie Oliver writes, because it's like having a conversation with someone who's telling me how to make a specific dish. It's so easy to follow his instruction!

This is a rotolo of spinach, squash and ricotta. When I wiki'd "rotolo" to find you a more specific definition of what it is, I found that "Rotolo" is an Italian surname. Haha! So, I'll give you the Mere-finition, which is that this dish is a roulade of pasta. Normally, a roulade is made with a thin piece of meat rolled around some sort of stuffing such as vegetables or cheese. I replaced the meat with thick lasagna noodles, and voila, a rotolo!

Alright, here we go! I made my fresh pasta dough and left it to rest for the necessary 30 minutes. It was a bit sticky tonight, but after a little extra flour on my kneading surface, I evened it all out. I then moved on to my 
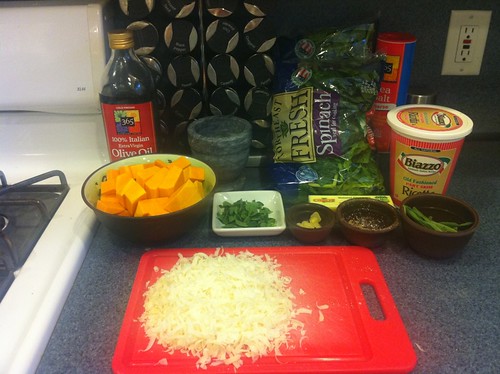
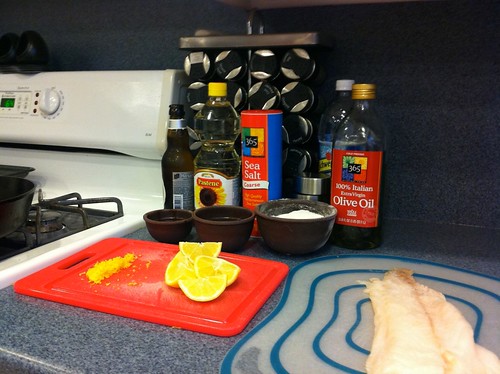
mise en place. The filling for the 
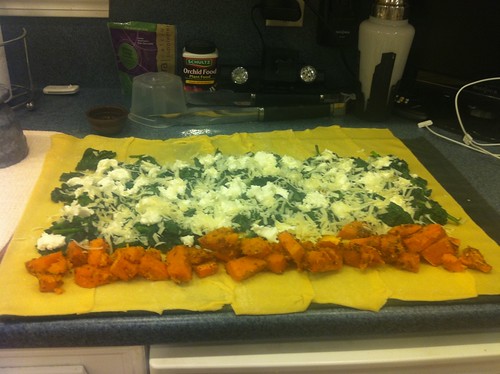
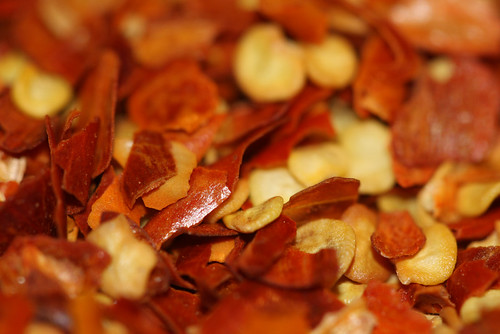
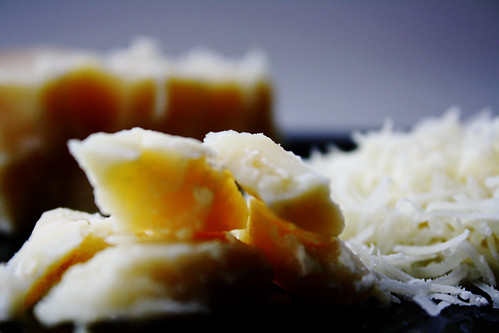
rotolo consists of butternut squash seasoned with fennel seeds, coriander seeds, chili powder, salt and pepper along with some wilted spinach, fresh oregano, garlic, butter and nutmeg. I also needed to get out my parmesan and ricotta. Finally, some extra butter and a nice handful of sage leaves, and my mise en place is complete!

IMG_0423

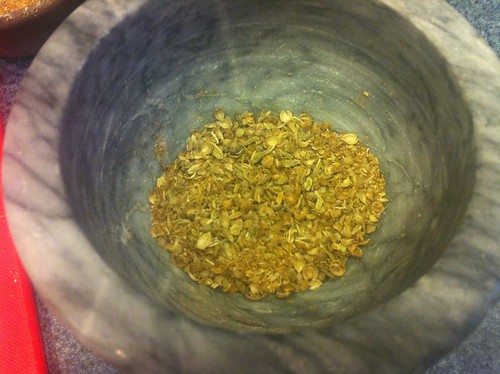
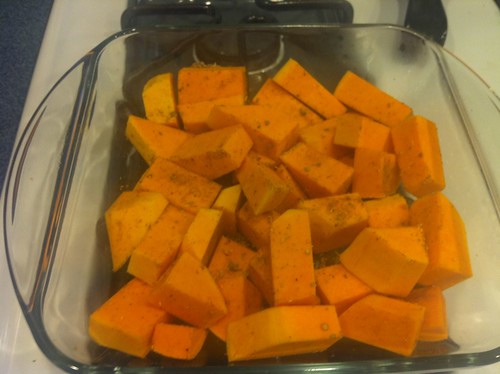
Once everything was out and prepped, I preheated my oven to 425 degrees because I need to cook the squash. I dusted the squash pieces with the crushed coriander seeds, fennel seeds, chili powder, salt and pepper and tossed the squash in a snugly fit dish.

IMG_0424

IMG_0425

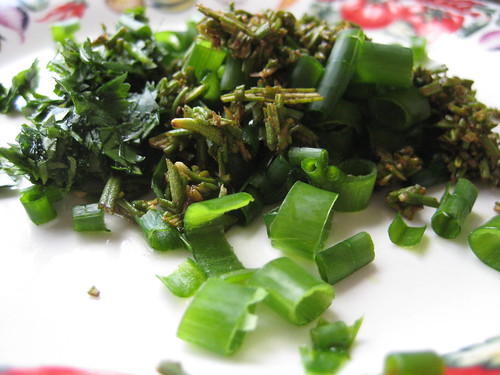
Once I got the squash in the oven (for 30 minutes - covered with a damp piece of wax paper), I started on the spinach since it was supposed to cool before use. I heated a nice glug of olive oil in a pan and added my sliced garlic and fresh oregano leaves.

IMG_0426

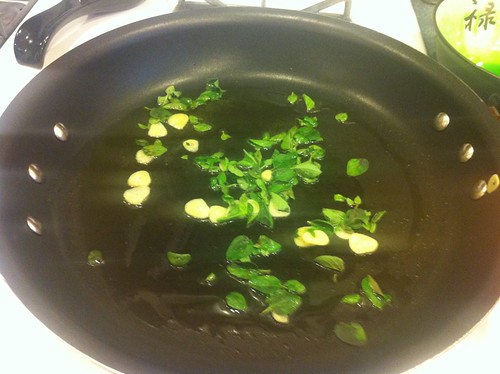
Once that had sizzled a bit, I started adding the spinach and as it wilted, I continued to add more. I had two whole bags to get in there so slowly but surely wins the race. Keep the spinach leaves moving around with a tongs so that none of them burn, but as the leaves wilt, it makes more room to add more leaves.

IMG_0427

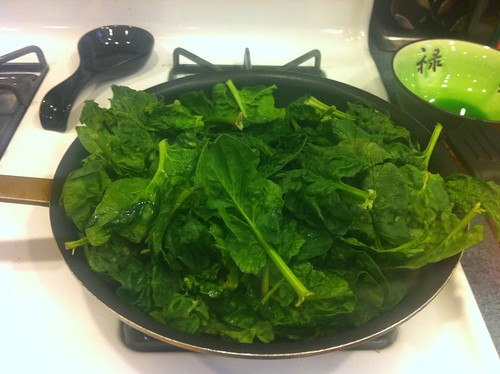
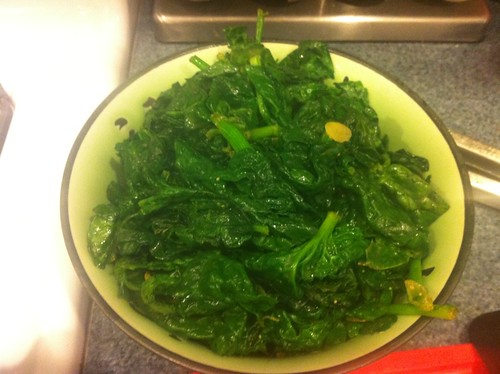
Continue this way until all the spinach has wilted down. At this point, you can season with nutmeg, and a few clumps of butter. Always taste your food, as you are cooking - then you'll know if you need to add some salt and pepper to this before taking it off the heat. I added a little bit of each and then removed the spinach to a bowl to cool.

IMG_0428

Once a half hour has passed, check on your squash. Remove the wax paper, toss them around a bit and put them back in for another 15 minutes - or until they are golden.

IMG_0429

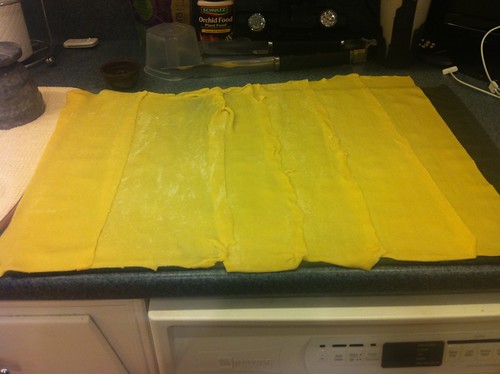
While the squash was finishing up, I used my pasta roller to make six long sheets of pasta. I laid them out on a dish towel (I would have preferred to use a white one - but I lucked out and nothing turned black at the end of this ordeal!). I used some water to stick the noodles together to make one long sheet.

IMG_0430

Once the squash was finished, I removed it from the oven and spooned it across the long side of the noodle sheet.

IMG_0432

I then sprinkled my cooled spinach around the rest of the sheet, leaving a 2 inch section at the top clear of any filling. That's the part that will tuck over to complete our rotolo.

IMG_0433

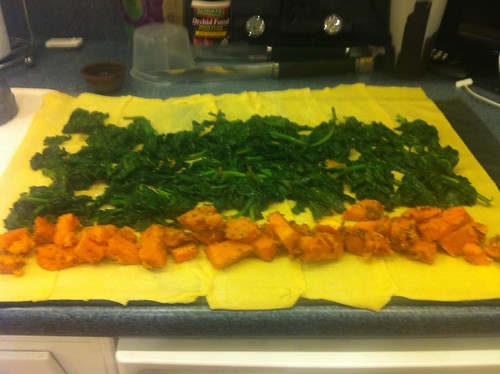
From here, I sprinkled both ricotta cheese and shredded parmesan cheese on top of this mixture.

IMG_0434

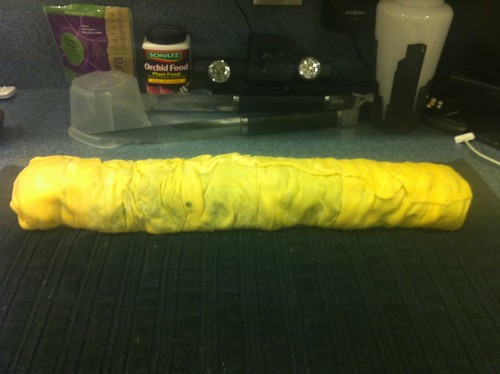
I used the edge of the towel to start my roll, and then continued tucking and rolling until I had one long roll of pasta and stuffing. Use a little bit of water on the top edge to stick it to the rest of the rotolo.

IMG_0435

Once it was rolled, I put a pot of water on to boil. I didn't have a pot really big enough for this so I kind of had to wind it around the side of the pot I was working with. The best case scenario would probably be an oblong-shaped fish pot, but we work with what we've got right!? While the water was boiling, the recipe instructed me to roll this up in a dish towel. I didn't have a nice, thin, white dish towel like Jamie did in the pictures, so I made do with what I had. I was a little concerned that my pasta would come out dyed a little black, but luckily, that did not happen! I tied the ends with some kitchen twine.

IMG_0436

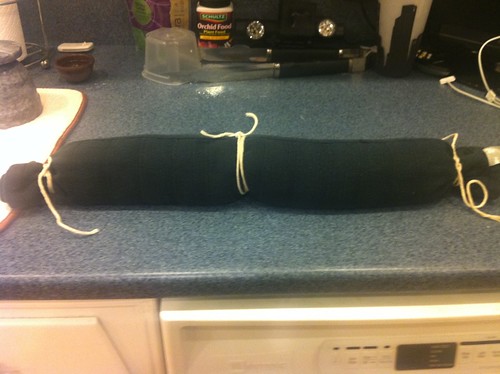
Once the water was boiling I placed this in the pot as best I could, and then placed a plate on top to hold it under the water since it tends to want to float to the surface. I left this to simmer for 25 minutes.

Meanwhile, I needed to clarify some butter by placing it in a very low heated oven, and allowing it to melt there. Once melted, I separated (as best I could) the white parts of the butter from the clear. I added the clear portion to a pan which I heated more aggressively. Once it was hot enough, I threw my sage leaves into the butter and allowed them to lightly fry.

IMG_0437

I pulled the leaves out and let them drain on a paper towel. I kept the now sage-flavored butter over a low heat so that it didn't start to congeal. I pulled the 
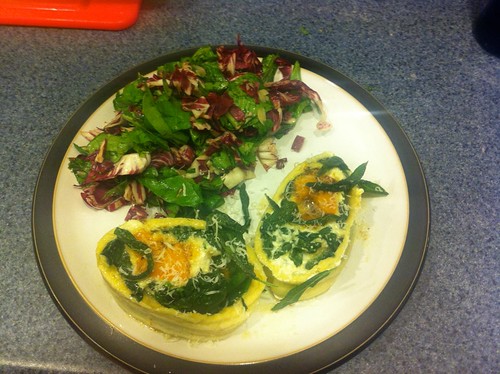
rotolo out of the boiling water with some silicon potholder gloves and unwrapped it onto a cutting board. Because I had to curve it to get it in the pot, it had burst open in a few places but not too badly. I sliced the rotolo into generous serving portions and plated! I decided to serve this beautiful looking roulade with an arugula and radicchio salad, dressed with only some balsamic vinegar and olive oil. I seasoned it with a little salt and pepper and tossed it with a handful of shredded parmesan.

IMG_0438

This isn't a dish you see on every Italian restaurant menu, but I'm sure glad it was on mine! :)

Sunday, March 27, 2011

Worth the Wait

I started cooking dinner around noon today! But don't be fooled by the amount of time it took to make this meal - it's totally simple, I promise! It's actually an extremely hands-off recipe, which makes for a great lazy Sunday in a house that smells too good to eat! :)

Chef Jamie Oliver describes this dish, Peposo (The Famous Hunter's Peppery Beef Stew) as a "powerful old Tuscan dish." This stew can be cooked overnight in a 275 degree oven - for up to 8 hours (like many Italians do) - or, like I did, it can be cooked for 6 hours in a 300 degree oven. My dish actually took more like 4 1/2 since I didn't have as much meat...which was lucky for me because I don't think I could have taken it a second longer. Seriously, the house smelled SO good!

First, let's take a look at my mise en place.

IMG_0394

The only prep work for this was cutting the meat off the bone. The recipe calls for 5 1/2 pounds of beef shin (or shank) but the meat is going to get so flaky and succulent over the next 6 hours that its just easier to cut it off the bone now. There's quite a bit of fat on these pieces but I didn't remove all of it - just the large chunks. The fat flavors the juice that the beef cooks in so you don't want to get rid of all of it. Also, check out the marrow in the middle of the bones - you totally want that in there, too. The marrow holds so much flavor and will fall out of the bones as they cook, adding to the delicious juices as well. When you purchase the beef shin (shank), they will look like this:

IMG_0393

Because the recipe calls for 5 1/2 pounds, I had to buy a few of these packages. I actually think I purchased more like 4 - 4 1/2 pounds since it really is only for the two of us...plus some leftovers. I figured having the exact amount of meat wasn't necessary - the recipe says it serves 10! Aside from the meat, I had 2 bottles worth of Chianti (I just bought a large bottle that is the equivalent of 2 regular bottles), 20 cloves of garlic, 5 rosemary sprigs, 2 bay leaves and loads of salt and pepper.

So, once I had my mise en place in place, I got out a large dish that would just hold all of my ingredients.  You don't want to have a lot of empty space in the pot so make sure you choose wisely. I placed a layer of the pieces of beef in the bottom of the pot and topped it with some of the garlic cloves, a couple of rosemary sprigs, a nice sprinkling of salt, and a bunch of freshly ground pepper (like, a lot of pepper - it IS pepper stew after all). Continue layering like this until you've used up the pieces of beef.

IMG_0395
Second layer
Once all the beef was used up, and I had thrown in all 20 garlic cloves, along with rest of the rosemary, I poured the Chianti into the pot, to the brim. You want everything to be covered in liquid. I didn't end up using the entire amount, but if you do run out of wine, you can finish filling the pot with water. Add the bones and the bay leaves for flavor and bring it to a boil on the stove.

IMG_0396

Once it came to a boil, I covered the pot with a double layer of aluminum foil and put it in my preheated oven. You want to keep all the moisture inside the pot. And then...you find something to do for the next 6 hours! :) I baked a loaf of bread, did some laundry, watched a Law and Order: SVU marathon, cleaned the kitchen, and changed the sheets. All in all, a pretty successful day, I'd say.

With an hour and a half left on the timer, I checked my pot to see how the meat was coming along, and was happy to find that it was pretty much done. I left it in for a little longer while I made my sides. I decided to saute some potatoes and kale to go with this stew, so I sliced up the potatoes and threw them in a cast iron pan with a little butter, salt and pepper. When the potatoes were browned and almost cooked through, I threw the kale on top and tossed until the greens had wilted.

IMG_0398

Once the potatoes and kale were ready, then I turned off the oven and pulled my stew out. The flavors had melded together so well and the marrow had fallen out of the bones. I pulled the bones and bay leaves out of the liquid, along with the rosemary sprig branches.

IMG_0399

And finally, it was time to plate this hearty meal. I broke the meat apart with a fork quickly, and smooshed the garlic cloves up a little bit, and voila, a lovely hearty Italian meal for us and lots of leftovers for the week! I drizzled some of the juices on top just before serving.

IMG_0400

This meal was very comforting and homey. I love enjoying a meal that has made my house smell so good all day because it's like finally eating something for which you've had a craving for a long time. It can also be served as an energizing brunch, scooped over a hearty slice of hot, toasted bruschetta, like it was traditionally given to hunters after a morning spent in the woods. Don't be put off by all the pepper because while I used quite a bit, it wasn't extremely potent after the 4 1/2 hours in the oven. I think I would probably use MORE pepper next time, but you can definitely manage the amount of spice that you'd like in your stew! Happy Sunday!

Thursday, March 24, 2011

Running on Empty

Well, I'm running low on pretty much everything in my kitchen. Tomorrow is grocery shopping day, thank goodness, so everything will be restored soon! I haven't cooked in a few days because of this so I'm jonesin' for some new ingredients. We've either eaten leftovers or ordered out the past few nights so I took the opportunity to update the menu on the site this evening.

fresh chopped herbs
from Flickr - by sparnie808

The current menu is set to commence this weekend, so I'm looking forward to a few weeks of yummy Italian fare. The recipes also make pretty large amounts of food, so I'm going to have some delicious leftovers for lunches while I'm at work the next few weeks. I love coming back from the gym, knowing there's a home-cooked delicious something-or-other, waiting to fill me up after a hard workout. It's very comforting to take a container out of the fridge, heat it up and have a little taste of home while sitting in your cube!

Tomato
from Flickr - by Feb12

I think this menu is timed perfectly for the weird winter/spring weather out there - a little bit refreshing, a little bit comforting and warming. Jamie Oliver's recipes always make for such feel-good, rustic dishes. So, check out the current menu, and I'll see ya back here with something Italian very, very soon!

Wednesday, March 9, 2011

Now That's-a Spicy Italian Sauce!

A while back, I wrote a post about The Advantages of a Homemade Bolognese, and when I wrote it, my intent was to intermittently touch on different sauces that you can use in your menu planning for easy and quick meals. For some reason, I had arrabbiata sauce stuck in my head today, so I thought I would share this spicy sauce with you in a post!

RedChiliFlakesFLICKR-02
From Flickr - by AntTree

Traditionally, this sauce is served with penne, as the tubular shape is great for picking up the chunks of tomatoes in the sauce! It's a very simple sauce of only four, sometimes five ingredients. The original version includes garlic, tomatoes, red chili flakes and olive oil. Some people add basil to this mix but the majority of Italian chefs won't do this. When the dish is served, it is usually sprinkled with some parsley, and in my case, Parmigiano Reggiano.

Big Cheese
From Flickr - by kellinasf

The great thing about this sauce is that you have control over how spicy you want it. The red chili flakes are HOT, so if you don't like a ton of spice, use a little bit...and if you love the heat, pile it on! My tip to you is start off slow, and keep tasting your sauce as it simmers! You can always add, but you can never take away!