Showing posts with label rice cooker. Show all posts

Monday, May 28, 2012

A Peppery Piperade

Phew, it's been almost a month since my last post - it's a jungle out there! Not only have I been very busy at work, but I've had to deal with a couple of medical issues, as well as planning a vacation for my husband, my puppy and myself! While I work on a compilation post of all the wonderful foods I encountered on our road trip to the great state of Virginia, I thought I'd get back into the swing of things with a simple, but time-consuming, dish that works great if you need leftovers for another night of the week! Because today is a holiday, and I have ONE more vacation day tomorrow, I planned a menu for the week that included a couple of large quantity meals that will feed us through the days that are going to be busy later in the week! The recipe for Chicken Basquaise comes from a cookbook that I got from my neighbor as a lovely birthday present. The book is called Around My French Table by Dorie Greenspan and I've based this week's menu around recipes from this book.

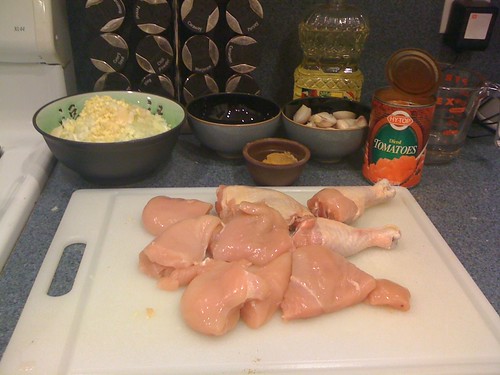
Basquaise, or "in the Basque style," usually means that the dish will have a ragout of peppers, onions, tomatoes and punch of spice. For this dish, I had to start off by making a piperade, which is another name for the aforementioned ragout. I prepped my mise en place first, and then started the cooking process. There's a lot of small batches of cooking times, that add up to quite a bit of hands-on time in the kitchen, but I decided to throw a pot on the stove to make some chicken stock, and also started a loaf of bread in the bread maker while I was waiting for each step. All the laundry from vacation even got accomplished while I was running around. It was a pretty productive afternoon.

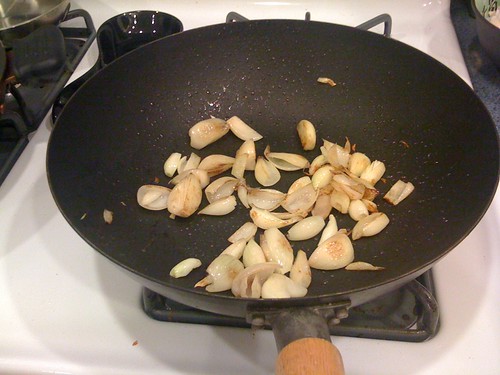
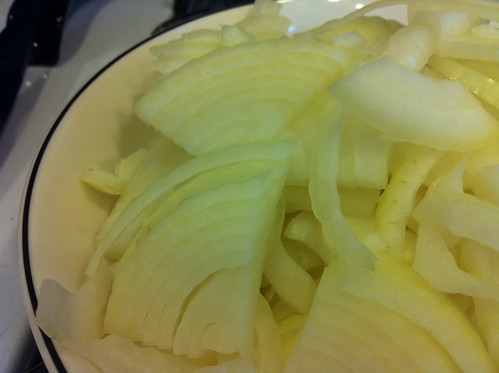
The first step is to sweat some sliced Vidalia onions with some olive oil for about 10 minutes. You want them softened, but not colored.

Untitled

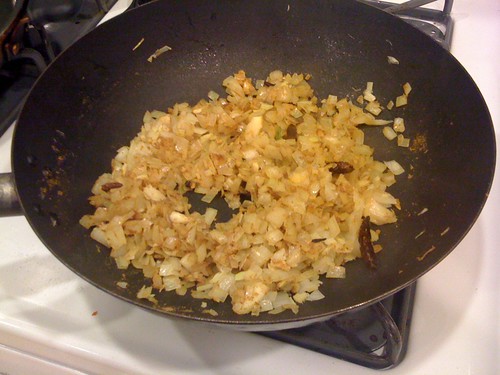
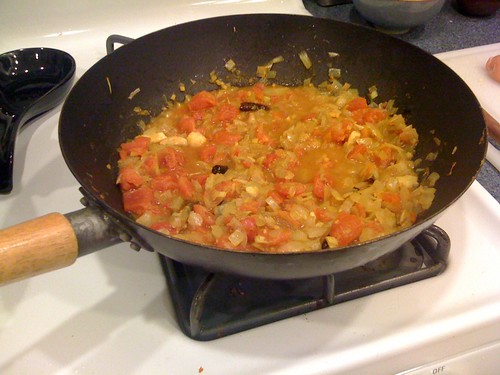
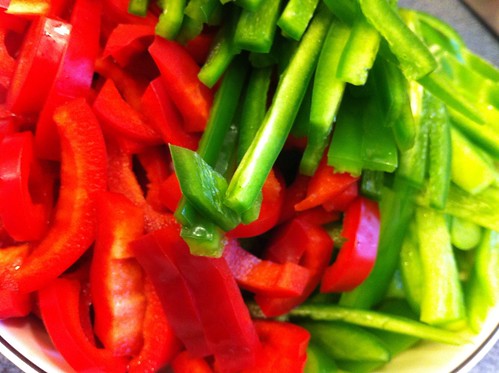
Once the timer beeped, I added sliced green peppers, red peppers, and jalapenos. I added another tablespoon of oil to the onions and peppers, and then covered the mixture, allowing it to cook for the next 20 minutes, getting all soft and delicious in there. I could have peeled the peppers if I wanted to, but the rustic-ness of a few pepper skins was a more attractive option than slowly charring pepper after pepper over an open flame until I was able to peel them.

Untitled

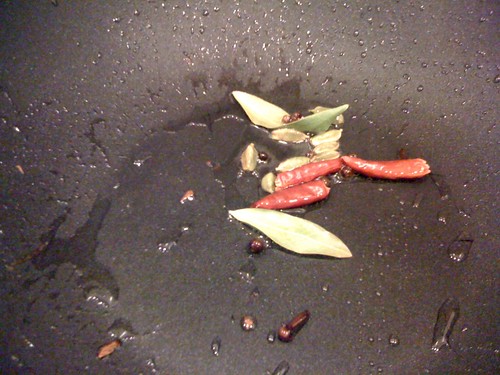
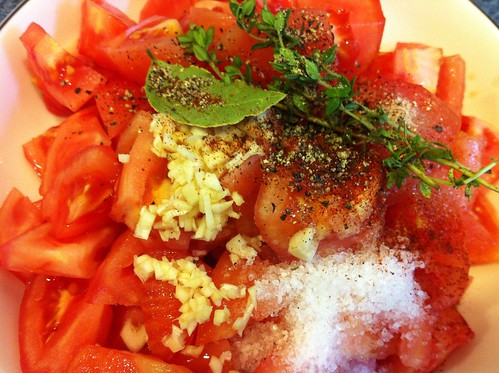
Twenty minutes passed, another load of laundry folded, a loaf of bread baking, and it was time to add some peeled and chopped tomatoes, sea salt, sugar, garlic, black pepper, thyme sprigs, bay leaf and some ground chipotle pepper to the mix. The recipe called for something called piment d'Espelette, which is a dried concoction of spicy chiles which is available in specialty stores for a pretty penny. Because it was possible to substitute a spice I already had, I went with that option to save a little money. I would have splurged had I thought I would use the ingredient on a regular basis, but I had a feeling it might just sit in the pantry for a year...so I didn't spend the money.

Untitled

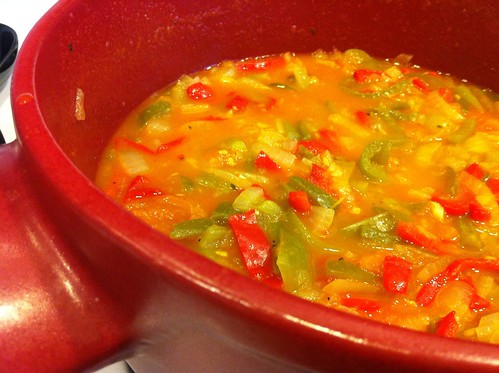
For 10 more minutes, the piperade simmered, covered, and then for another 15 minutes, uncovered. I made sure to stir the mixture every few minutes. Once the piperade was completed, I reserved about two cups of it for eggs tomorrow morning. A cool thing about this cookbook is that there are small suggestions on the sides of the pages, called Bonne Idees (good ideas), where they suggest other ways to use leftovers, and Piperade and Eggs sounds like a really good idea, so I will report back on that!

Untitled

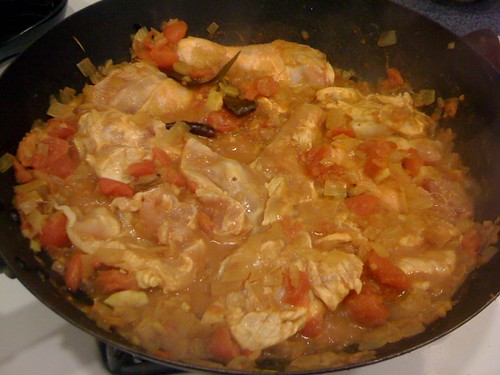
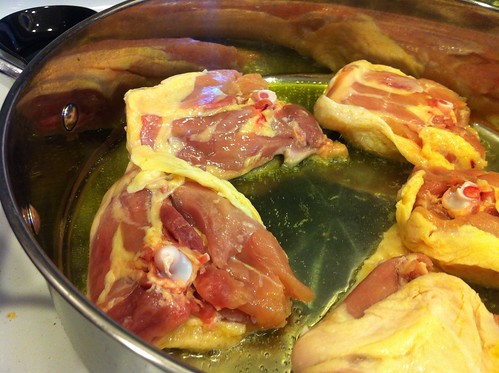
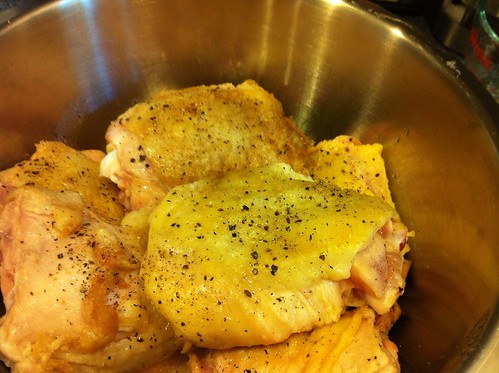
Now I could prepare my chicken thighs. I patted them until they were dry, using a paper towel, and then added them to heated oil (in batches), skin side down. After about 5 minutes, I flipped them and cooked them for another 3 minutes before transferring them to a bowl and seasoning them with salt and pepper. I repeated the process until all of my chicken thighs had been browned.

Untitled

Untitled

Once all the chicken had been par-cooked, I poured the oil out of the pan, and replaced it with some white wine, scraping up the brown bits and crunchy skin pieces that had been left in the pan, as the wine reduced. I returned the chicken to the pan, and covered it with the piperade. After bringing it to a boil, I reduced the pot to a simmer, and allowed it all to cook together for another 40 minutes. When I told you I was in the kitchen for awhile today, I meant it! At least this 40-minute interval gave me time to enjoy a chapter of my book on my new Kindle Fire, an awesome birthday gift from my husband.

Untitled

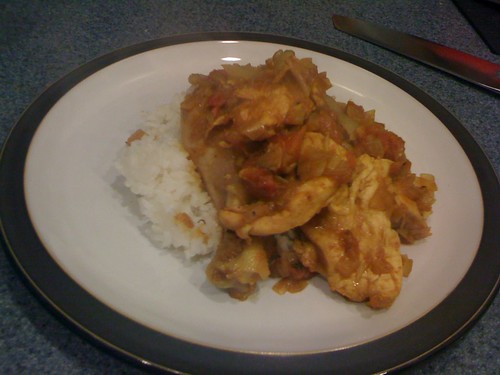
While the chicken cooked, I also made some brown rice in my rice cooker. They ended up finishing up around the same time, and I plated the meal. This was a really great dish, cozy and comforting but also refreshing and light. We ate four of the eight thighs in the pan, leaving us dinner for Wednesday night, since we will most likely be getting home late, after Yappy Hour (yup, we can bring the dog and enjoy drinks outside while she plays). This was definitely worth the time, and we've even got something interesting for breakfast tomorrow as well!

Untitled

I'm back! :)

Saturday, March 12, 2011

Bul-Goh-Gi!

This morning, while my husband made us some breakfast, I put together the marinade for our dinner, Lamb Bulgogi with Asian Pear Dipping Sauce, another Korean favorite of ours. Since the lamb needed to marinate for at least 4 hours before cooking, I decided to put everything together before we left the house to enjoy the warmer weather.

Because the only prep work required for this recipe is throwing some ingredients in a bowl, I didn't do a mise en place photo this time around. Please forgive me this indiscretion! :) For the marinade, you'll need:

4 green onions, coarsely chopped
3 tablespoons sugar
3 garlic cloves, coarsely chopped
1 2-inch piece fresh ginger, peeled, cut into thin rounds
2/3 cup soy sauce
2/3 cup mirin (sweet Japanese rice wine)
1/3 cup Asian sesame oil
2 tablespoons toasted sesame seeds
1 teaspoon freshly ground black pepper
1 boned butterflied leg of lamb, trimmed of excess fat (about 5 1/2 pounds)
(I used a leg of lamb that weighed less, since it was only two of us eating)

Now, I know that looks like a lot of ingredients for a marinade but this is pretty simple. Just throw the green onions, sugar, garlic cloves, and ginger into a food processor and blast 'em until finely chopped. You might have to use a spoon or spatula to push down the sides a few times. Once its all chopped up, transfer this mixture to a bowl and add the soy sauce, mirin, sesame oil, sesame seeds and black pepper. Whisk this all together and pour half of it into a container long enough for the lamb to lay flat. Add the lamb to this mixture and flip it around a little bit to coat. Then pour the second half of the marinade over the top. Cover with saran wrap and refrigerate for 4 hours up to one day, which means you can do this one night, let it marinade over night for a week night dinner too!


Okay, so let's fast forward a bunch of hours to dinner-time! I pulled this out of the fridge and got ready to start the rest of the prep work. My husband helped me out tonight by manning the grill outside while I got the rest of dinner together. As he left our apartment for the downstairs patio, I put the sticky rice in my rice cooker, and hit the "cook" button. I then turned my attention to the Asian Pear Dipping Sauce, which proved to be just as easy as the marinade, with almost as many ingredients. You'll need:

1 cup chopped, peeled, cored Asian Pear (about 1/2 large)
2 green onions, chopped
1/2 cup soy sauce
1/2 cup mirin (sweet Japanese rice wine)
3 tablespoons sugar
3 tablespoons Asian sesame oil
2 tablespoons sesame seeds, toasted

For the sauce, add the pear and green onions to a food processor and pulse until it turns into a smooth puree. Once that happens, add the soy sauce, mirin, and sugar, and pulse until the sugar is incorporated. Add the sesame oil and pulse again until the oil blends with the mixture. Once the sauce was finished, I put some Korean appetizers into bowls (marinated, pickled cucumbers and a daikon, carrot slaw - both purchased at H-Mart). I also put some Korean red pepper paste into a bowl.


When I knew that the lamb was almost done, and the rice cooker had clicked to let me know the rice was ready to go, I separated the leaves from a head of butter lettuce (for making little wraps) and cut up some jalapenos and garlic cloves to grill for garnish, along with some green onions. We threw those on the grill in a little basket (I didn't have the skewers called for in the recipe) towards the end of the lamb's cooking. (If you decide to go with the same size lamb leg that the recipe calls for, then cook it for about 20 minutes per side, but if you go for a smaller size, you'll have to experiment. We put it on for 10 minutes each side, and it wasn't cooked through - so we cooked it another 10 minutes...we probably could have gone a few minutes less, for a pinker center)


Once the lamb was done, I sliced it all up, and plated it along with the charred green onions, roasted garlic cloves and grilled jalapeno halves. Each of our plates got a scoop of sticky rice and we were ready to eat!


Now, bulgogi can be eaten any way you would like, but my favorite way, and the way they serve it in Korean BBQ restaurants is as follows: Take a lettuce cup and add a little bit of rice. On top of the rice, put a slice or two of meat and top with some red pepper paste. At this point, you can add some of that garlic, or a jalapeno, or a charred scallion - whatever your little heart desires. Roll it all up like a little Korean taco, dip it in that Asian Pear Dipping Sauce and take a nice big bite! Add some of those Korean appetizers to your plate for a nice side to your bulgogi.


Yummy! :)

Sunday, February 20, 2011

A Successful Attempt at a Korean Favorite

Remember my recent post about all different types of Asian cuisine and their differences? Well, tonight I made an attempt at a Korean favorite of ours, Bibimbap. Traditionally, Bibimbap is a dish served in a warm clay pot, consisting of rice, vegetables, thinly sliced beef and a fried egg, topped with a Korean red chile paste. The recipe I decided to use is a part of The Professional Chef, a textbook from The Culinary Institute of America. I usually use this book as a reference guide, in order to master techniques, but I thought I'd give this recipe a shot, and I'm very glad I did!

bibimbap♡
From Flickr - by Eunmi Han

This particular version of Bibimbap called for some skirt steak to be marinated in some soy sauce, garlic, ginger, green onions, sesame oil, crushed sesame seeds and pepper. The marinade was really tasty and added some great flavor to the dish. Once I'd made the marinade, I put the vegetables together. The recipe called for daikon, radish, carrots and cucumbers all julienned. One of my cucumbers had gone bad in the refrigerator :( and I didn't have any daikon, but I used some jicama instead, and also added some julienned shiitake mushrooms as well. Even though the recipe called for raw vegetables, I threw them in the wok with some peanut oil for a few minutes, just to soften the carrots and take the chill off the rest of the veggies. Everytime I've ever had Bibimbap, the vegetables have been cooked so I altered that part a little bit. I threw them in a stainless steel bowl and topped it with a pot lid so that steam could continue to cook the veggies a little bit while I finished off the rest of the dish.

While my rice cooked in my wonderful rice cooker, I threw the marinated beef into the wok with a bit of vegetable oil. It didn't take more than a few minutes for the small pieces to cook through, and while that was happening, I fried two eggs in a skillet, keeping them "sunny-side up" so that they would be runny when the yolk was broken over the dish. My rice cooker clicked when it was finished and I spooned some sticky rice onto each plate. I topped the rice with my steaming carrots, jicama, radish and shiitake mushrooms. I sprinkled some chiffonade of iceberg lettuce on top of that, and as it started to wilt from the heat, I piled on some beef. Lastly, I laid the fried egg on top of all of this!


For the sauce, the recipe really just called for Korean Red Chile paste but I wanted to thin the paste a bit so I mixed in some fish sauce, some rice wine vinegar and a little bit of sweet rice wine. It did exactly what I wanted it to do, and thinned down to more of a sauce...which was great for dripping over the already delicious concoction.

Normally, this dish is served in a clay dish that stays warm for an extended period, and continues to cook the rice while you eat, making it crispy and crunchy on the sides of the bowl. It adds something special to the dish, but even without those clay dishes, I really think I nailed the authenticity. It was so delicious and reminiscent of our trips to Korean restaurants! It's always a good feeling when you know you can make something that you love to order out - less money spent, more confidence in my culinary achievements! Try making your favorite restaurant dish at home...and share your experiences with us! We're rooting for you!

Also, check out my new and improved Stock Your Kitchen page. I've renovated it so that you can automatically add my recommendations to your Amazon shopping cart, should you be interested in purchasing something that I've mentioned in any of my posts. Hopefully, this will be more convenient!

Wednesday, February 2, 2011

Hug Your Closest Sri Lankan!

HOPE - You Can See The Light. Taken in Sri Lanka Gelioya (Kandy)
Sri Lanka
The other day, I received an invitation to an event on Facebook. The event in question is "Hug a Sri Lankan Day," and it takes place on February 4th. That's FRIDAY! Sri Lanka is located off the southern coast of the Indian sub-continent. It is an island nation. In honor of this day, and my friend Ladali, who is Sri Lankan, I decided to make a fitting dish, complete with how-to instructions, just in time for you to cook dinner on Friday. I chose a Chicken Curry dish, also known as Chicken Dopiaza. The original recipe can be found here. I'm sure that you could make this with other types of meat as well, and for you vegetarians out there, I have a feeling that these flavors would work very nicely with some tofu (you'll have to adjust times a bit, that's all). Now, let's start with what you'll need:

3 tablespoons vegetable oil
8 small onions/shallots, halved
2 bay leaves
8 green cardamom pods
4 cloves
3 dried red chilis
8 black peppercorns
2 big onions, finely chopped
2 garlic cloves, crushed
1 inch piece of fresh root ginger, finely chopped
1 teaspoon ground coriander
1 teaspoon ground cumin
1 teaspoon ground turmeric powder
1 teaspoon chili powder
1/2 teaspoon salt (to taste)
4 tomatoes, skinned and finely chopped (I used canned, diced tomatoes)
1/2 cup water
8 chicken pieces, skinned
plain rice, to serve

This seems like a lot of ingredients, I know, but it's actually a very simple dish, and it's delicious. I happened to have these spices on hand, but if you don't, you can find them at your local grocery store, or order them online if you have a few days before you plan on cooking this dish. Now, of course, the first step is your mise en place. But, for mine, I combined the ingredients for each step into separate bowls, to make it easier for me. If you want to do it that way, this is what should be in each bowl:

Bowl #1: Shallots
Bowl #2: Bay leaves, cardamom pods, cloves, chilis and peppercorns
Bowl #3: Onions, garlic, and ginger
Bowl #4: Coriander, cumin, turmeric, chili powder and salt
Bowl #5: Tomatoes and water
Bowl #6: Chicken


IMG_0251

We're ready to begin cooking! Before I start with the main part of this dish, I put the rice and water into the rice cooker since that usually takes about a half an hour to cook. Rice cookers are a fabulous invention. All you have to do is press the cook button, and it turns off when the rice is done. When I cook rice, I always use the ratio, 1:2. If you use a cup of rice, you should pour in 2 cups of water. That goes for any measurement of rice...double it for the water. Then, set it...and let it go!

IMG_0250

Now, on to the main course, right? It's about time! I promise things are going to go quickly from here! I made this dish in a wok, but you can also use pretty much any large pan. Be sure that it's large enough to fit all the things you are going to put in it.

Heat 2 tablespoons of the oil in the wok, or large pan, and fry the halved small onions/shallots until soft (I used shallots). Remove and set aside. Make sure those shallots are really soft, because otherwise, they are going to be a very overwhelming flavor in the finished product. Shallots get sweeter as they cook.

IMG_0252

Add the remaining oil and fry the bay leaves, cardamoms, cloves, chilis and peppercorns for 2 minutes. Be careful here...as the cardamom pods get hot, they can pop. One almost knocked my EYE out!

IMG_0254

Add the big onions, garlic, and ginger. Fry for 5 minutes.

IMG_0255

Add the spices (coriander, cumin, turmeric, and chili powder) and salt and cook for 2 minutes.

IMG_0258

Add the tomatoes and water to the pan and simmer for 5 minutes until the sauce begins to thicken.

IMG_0261

Add the chicken pieces and cook for 15 minutes more. Once I added the chicken and it had begun to cook, I found that the sauce needed a little bit more water because it was evaporating quickly. Don't be afraid to trust your instincts and add something if you feel it needs it.

IMG_0262

Add the reserved shallots back to the pan, and then cover and cook for another 10 minutes until the chicken is tender. I cut about 4 minutes off this time because I found that my chicken was done, and I didn't want to over cook it. However, it all depends on the size of your pieces, the parts that you choose to use and the temperature of your pan, so you be the judge. Once it looks tender and cooked through, take it off the heat so that the meat doesn't get chewy. Serve over rice.

This was a delicious meal, and I found it to be an educational experience. I have friends from all over the world, and it is always a treat to learn about their cultures and cuisines. It's not every day that you see a Sri Lankan restaurant, or even think about cooking a Sri Lankan meal, so I'm very happy that I took this opportunity to learn about this fascinating cuisine. I will definitely be trying more in the future, and I'll be on the lookout for a restaurant too. I'm intrigued! And a great big thank you goes out to Ladali for pointing me in the right direction for this post. I will be giving her a GREAT BIG HUG on February 4th!

IMG_0265