Showing posts with label beef. Show all posts

Sunday, August 14, 2011

Mambo Italiano!

We're jumping off the Asian continent for awhile, and heading over to Europe...to my favorite country, Italy! The best part of Italian cuisine is its rusticness. Don't get me wrong, there's definitely fine Italian cuisine that is very delicate and refined, but I just love the big bowl of pasta, the hearty sauces, and the braised and roasted meats...meals that make for a real meal!

The dish I chose for my representation of Italy's cuisine is appropriately from Jamie's Italy. In Italian, Spiedini di Salsiccia e Manzo, means Sausage and Beef Kebabs. They are roasted in the oven, and I opted to serve them over a rich polenta, which is a cornmeal-based porridge-y side dish.

First things first, the meats needed to be marinaded. I cubed my beef, cut up my thick slices of pancetta and cut the Italian sausages into thirds by twisting them and then snipping in between each section. The marinade consisted of sage leaves, garlic, lemon zest, lemon juice, salt, pepper and olive oil. Once all of those ingredients are mashed up in a mortar and pestle, pour it over the meats and some more sage leaves. That can marinade for 1-3 hours if you have time, but if not, just go ahead with the next step. I made sure to let it marinate for about 3 hours, though.

IMG_0905


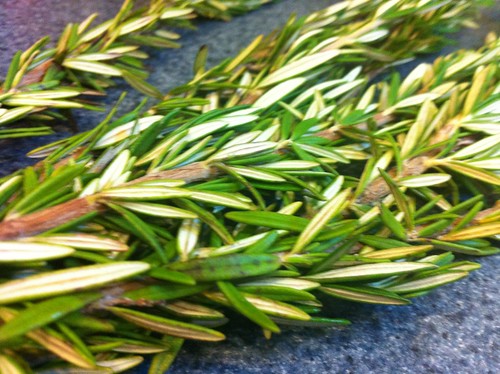
If you can find rosemary skewers, they are certainly a special treat, but if you can't, you can also use metal or wooden skewers available in most grocery stores. I happened to find rosemary skewers so I was psyched to use them for the added flavor. After you strip the skewers of all the rosemary except for a few fronds at the top (and save it for another recipe), use a knife to kind of whittle away the bark of the skewer, and form a point on the end of each as well.

IMG_0906


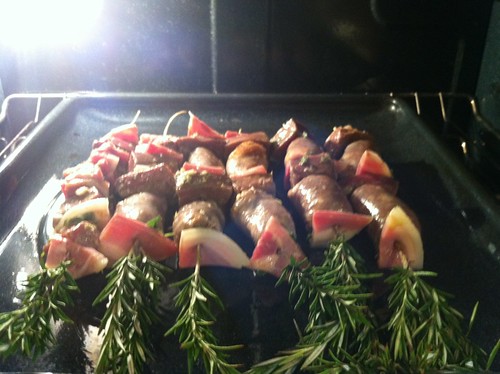
While my oven was preheating to the highest temperature, I started building my kabobs: pancetta, sage leaf, sausage, beef, and continue that way until your skewer is full. When you've completed either all your skewers, or finished off the marinated meat (whichever comes first), it's time for them to go in the oven. Right before that, turn the oven down to 400 degrees so that as the oven cools, it continues to roast the kabobs.

IMG_0907


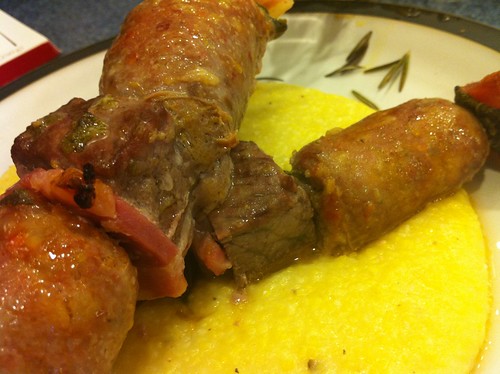
After 20 minutes, your kabobs should be juicy, fragrant and best of all, ready to eat! You can squeeze some lemon juice on top before serving. I made a quick polenta, loaded with parmesan and a little bit of butter, as a bed for the kabobs. Each bite, with a bit of meat, a bit of sage and a bit of polenta was hearty and decadent. Rustic Italian cuisine at it's best!

IMG_0909

Sunday, February 20, 2011

A Successful Attempt at a Korean Favorite

Remember my recent post about all different types of Asian cuisine and their differences? Well, tonight I made an attempt at a Korean favorite of ours, Bibimbap. Traditionally, Bibimbap is a dish served in a warm clay pot, consisting of rice, vegetables, thinly sliced beef and a fried egg, topped with a Korean red chile paste. The recipe I decided to use is a part of The Professional Chef, a textbook from The Culinary Institute of America. I usually use this book as a reference guide, in order to master techniques, but I thought I'd give this recipe a shot, and I'm very glad I did!

bibimbap♡
From Flickr - by Eunmi Han

This particular version of Bibimbap called for some skirt steak to be marinated in some soy sauce, garlic, ginger, green onions, sesame oil, crushed sesame seeds and pepper. The marinade was really tasty and added some great flavor to the dish. Once I'd made the marinade, I put the vegetables together. The recipe called for daikon, radish, carrots and cucumbers all julienned. One of my cucumbers had gone bad in the refrigerator :( and I didn't have any daikon, but I used some jicama instead, and also added some julienned shiitake mushrooms as well. Even though the recipe called for raw vegetables, I threw them in the wok with some peanut oil for a few minutes, just to soften the carrots and take the chill off the rest of the veggies. Everytime I've ever had Bibimbap, the vegetables have been cooked so I altered that part a little bit. I threw them in a stainless steel bowl and topped it with a pot lid so that steam could continue to cook the veggies a little bit while I finished off the rest of the dish.

While my rice cooked in my wonderful rice cooker, I threw the marinated beef into the wok with a bit of vegetable oil. It didn't take more than a few minutes for the small pieces to cook through, and while that was happening, I fried two eggs in a skillet, keeping them "sunny-side up" so that they would be runny when the yolk was broken over the dish. My rice cooker clicked when it was finished and I spooned some sticky rice onto each plate. I topped the rice with my steaming carrots, jicama, radish and shiitake mushrooms. I sprinkled some chiffonade of iceberg lettuce on top of that, and as it started to wilt from the heat, I piled on some beef. Lastly, I laid the fried egg on top of all of this!


For the sauce, the recipe really just called for Korean Red Chile paste but I wanted to thin the paste a bit so I mixed in some fish sauce, some rice wine vinegar and a little bit of sweet rice wine. It did exactly what I wanted it to do, and thinned down to more of a sauce...which was great for dripping over the already delicious concoction.

Normally, this dish is served in a clay dish that stays warm for an extended period, and continues to cook the rice while you eat, making it crispy and crunchy on the sides of the bowl. It adds something special to the dish, but even without those clay dishes, I really think I nailed the authenticity. It was so delicious and reminiscent of our trips to Korean restaurants! It's always a good feeling when you know you can make something that you love to order out - less money spent, more confidence in my culinary achievements! Try making your favorite restaurant dish at home...and share your experiences with us! We're rooting for you!

Also, check out my new and improved Stock Your Kitchen page. I've renovated it so that you can automatically add my recommendations to your Amazon shopping cart, should you be interested in purchasing something that I've mentioned in any of my posts. Hopefully, this will be more convenient!

Thursday, February 17, 2011

Radhika's Kebab Sausage with Tomato Jam

Tonight, I'm making sausages! Well, it's a loosely based version of a sausage, as there's nothing being stuffed into any sort of skin, but still...Quickfire Challenge here I come! (For all you Top Chef fans, you know exactly what I'm talking about, but for everyone else - it's from the Quickfire Cookbook, which includes recipes created during challenges on the show, Top Chef.)

This specific challenge was to create a signature hot dog. Radhika, from Season 5, made these great Kebab Sausages, and here we are, making them ourselves! You can find the recipe here. This recipe also calls for a bunch of accoutrements for the sausages. I'm sure these sausages would be wonderful on a roll, like the recipe describes, but I decided to serve them over a delicious, parsnip puree instead! A little heartier, and more ... dinner-like! :)

The first thing I did was make the sausage mixture. For this, I mixed 1 pound of ground lamb, 1/2 a pound of ground pork, and 1/2 a pound of ground beef with a tablespoon of minced garlic, 2 tablespoons of Tandoori Masala, kosher salt and ground black pepper. Once the mixture was blended, I put half of it into a food processor until it was finely ground. Then I mixed the finely ground portion back into the rest of bowl, and mixed some more. I then formed the mixture into the shape of logs, sort of like bratwurst.


Once that was done, I turned the oven to 350 degrees to preheat while I made the sides. I chopped a red onion into slices, and put them in a pan with a little canola oil to cook down for about 20 minutes. These browned onions sweeten as they cook and make a lovely topping for the sausages. In another bowl, I put a cucumber (peeled, seeded and diced), cilantro, white wine vinegar, capers and a little salt and pepper to taste. I set this aside to macerate for 20 minutes. In a third bowl, I made a tomato jam, which consists of mayonnaise, tomato paste, cumin and a little bit of heavy cream. I only used enough cream to thin the concoction, rather than the amount that the recipe depicts.


I browned the sausages on all sides in a skillet and then added them to a baking sheet I had waiting in the preheated oven, and then cooked them for another 10 minutes.


Once they were done, I plated the parsnip puree and piled two of the kebab sausages on each plate. I served the sides separately, allowing us each to choose our toppings appropriately. Once I added my toppings, I took a picture so you could see the finished product!


Voila! And this just goes to show, you don't even need a special tool to make your own sausages. They tasted a bit meat-loafy when cooked, and the sides were the perfect accompaniment to the flavors in the sausage. I really liked my pairing of the parsnip puree. I think it added something that a sandwich roll couldn't have contributed to the dish!

Wednesday, January 19, 2011

The Importance of Multiple Cutting Boards

Mum's present - Chopboard.

When you start your mise en place, it is imperative that you have a different cutting board for meats and vegetables. There are numerous ways to accomplish this, but you MUST make sure you do it. Meats carry a lot of bacteria before they are cooked, and even if everything is eventually going into the same pot, vegetables can still be contaminated with that bacteria prior to being cooked. For this reason, I make sure to take out a cutting board for each type of ingredient I will be prepping, before I even start. You can do this with color-coded boards, which are sometimes sold in packs.


Alternatively, there are some very cute sets that even have little pictures on them. I have a set of 4, from Sur La Table, with pictures of a fish, a cow, a chicken, and a carrot on them. This set is similar to the one I have: Cutting Boards. These are only $16 and that is a small price to pay for keeping you and your loved ones healthy when you cook. 

steel 3


This goes for knives as well. I have two favorite knives, so I tend to wash them if I need to cut more than one type of meat, but normally, I've got one set aside for my protein, and the other will prep the veggies and other ingredients. As long as you wash your knife with soap in between ingredients, you don't really need to have more than one. 


Raw chicken can carry Campylobacter, as well as Salmonella, the leading cause of food borne illness. Raw beef can also carry Salmonella and Campylobacter, in addition to Listeria Monocytogenes and Staphylococcus Aureus. Raw fish can carry Anisakis Simplex (or Herring Worm), and Vibrio Species. Now let me clarify - don't stop eating these proteins because of this information. These bacteria can be spread through the improper cleaning and care of raw meats. That's why, if you decide to try making sushi at home, ALWAYS make sure that you are buying sushi-grade fish. This way, you are assured that the fish was handled properly for raw consumption. This is the case with beef too - you CAN eat it raw, as long as it's prepared appropriately. On the other hand, you can NEVER eat chicken raw...don't even contemplate it. 


Finally, I'd like to give an example of a more complicated meal, just to give you an idea of how careful you need to be. Let's say you are cooking an Asian stirfry, with beef, shrimp, chicken and veggies. You need 4 cutting boards for this meal, to be on the safe side. You'll also either need 4 knives, or a sponge and dish soap, to wash the knife in between ingredients. 


Healthy and safe cooking to you all, and to all a good night! 

Wednesday, January 5, 2011

The Menu - The Focal Point of your At-Home Culinary Journey

When it comes to planning my meals, I make a menu, and it comes in handy for numerous reasons. First of all, never again will you ask the question, "What do you want for dinner tonight?," only to be answered by "I don't know." Yea - I know, you ALL know what I'm talking about!

Second, it makes going to the grocery store a helluva lot easier, don't you think? A list of things you'll need to make meals for numerous days in a row - it's a brilliant concept, right? More on that in a later post, I promise!

You can plan a menu by day, or by type of food, or by country of origin, you can do it anyway you like...but here's how I do it: I make a list of different main ingredients and I pick ONE recipe for each of those main ingredients. You can't get bored if you're only eating chicken once every 2 weeks! My categories are as follows: Fish, Shellfish, Chicken, Beef, Pork, Lamb/Veal, Soup/Sandwich, Risotto, Pasta and Breakfast for Dinner. My husband especially likes that last one...

This little tip will help you plan ahead for your meals. You can prep things ahead of time if you know you are going to be home late one night. Marinating something overnight, and then just throwing it in the oven when you get home is the easiest way to get a great, home-cooked meal without all the fuss!

I normally just spell it all out on a piece of paper, which I then check off when I make one of the meals. Sometimes the menu lasts longer than other times, just based on things that come up - did we meet someone out somewhere for dinner? Did we both feel like sushi one night? Did I just SERIOUSLY not feel like cooking - because that happens once and awhile...and that's okay!

Whichever way you plan your menu, I promise you will find that it helps you immensely in the long run. It's much less stress to just know what you have to cook when you get home - and sometimes, even get excited about it! :)

I'd love to hear your feedback - if you try my tips and think they are good...or even if you hate them...leave me a comment and let me know! It will definitely help me figure out what road to take this blog on!