Showing posts with label rosemary. Show all posts

Tuesday, January 17, 2012

Making Bread Without the Bread-Maker

Yesterday, I sat down to plan out our meals for the week, and realized that we have a lot going on! Because we have some things to do after work today, I decided to make something for dinner last night that we could enjoy again today, without too much effort. I opted for a Dijon Chicken Stew with Kale. It sounded hearty, and warming, and it seemed to make a large amount which meant we could enjoy it for two nights of deliciousness! But...what to serve with it? It sounds great, but you can't JUST have a heaping bowl of stew for dinner...I'm a fan of having different things on my plate. So, I turned to my binder full of recipe cut-outs and thumbed over to the Bread section. What kind of bread would be good for soaking up the remnants of a hearty stew like the one I decided to make? Aha - I got it! Rosemary focaccia!


I've never made focaccia before, and I'm more the bread-machine type of bread maker, but I decided to give it a go. If you have a few hours to kill, and the patience to be in and out of the kitchen for those few hours, then this recipe is for you! This is not the type of dough that can be made in a bread-machine, nor can it be cooked that way. This is a hands-on task...know that before you take it on!

I don't have pictures of all the steps because it was kind of slow-going, but the entire recipe can be found at the link above, so everyone should give it a go! I have a feeling I'm going to add it to my repertoire because this is some DELICIOUS focaccia. After making a boiling water, honey and rosemary concoction, and allowed it to cool to a warm 110 degrees, I added some yeast and let it sit for about 5 minutes. Meanwhile, I gathered the rest of the ingredients for the dough, and once they were all incorporated, I began a 10 minute stint of kneading...and boy are my arms tired. Ten minutes is a long time to be moving, kneading and pressing into dough, but eventually, it got to that smooth, elastic-y point where it was ready to rest, and rise!


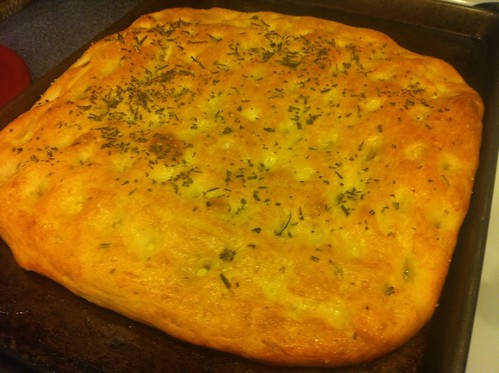
Forty-five minutes later, I walked into the kitchen to find a giant ball of dough, which I punched down, and then spread out on a baking sheet with my fingers. The dough was really plyable and I just knew that I was doing things right! Ya know how you can tell when something really doesn't seem right? I didn't have any of those feelings, even though this was my first attempt! After another 20 minutes of rising on the baking sheet, we were finally ready to brush the surface with egg yolk, olive oil and and water. First, I had to make those infamous focaccia indentations with my pointer finger. After the surface was glossy with egg yolk mixture, I sprinkled some sea salt along with chopped rosemary all over the top and it was finally ready for the oven!


After 25 minutes in a 350 degree oven, we finally had focaccia to enjoy! As it was cooking, I started on my stew and while the focaccia cooled considerably while the stew was cooking, it tasted so fresh and delicious. The savory salt and rosemary flavors paired really well with the Dijon Chicken Stew, and provided the perfect "sopping" tool! What a delicious meal! I can't wait to eat it again tonight!

Sunday, December 18, 2011

Healthy and Fresh

I finally got my act together and planned a menu for the upcoming week. It was a necessary evil, as I just found out we'll be having my in-laws in house for Christmas Eve, as well as Christmas Day, so I had to have a plan! While I was at it, I planned out the rest of the week as well. Be sure to click over to the Current Menu tab to check it out. With all the holiday plans and get-togethers, it's been hard to find time to eat a meal at home. I'm looking forward to a whole week's worth of them!

I really wanted something healthy, and full of fresh ingredients for tonight's dinner, but I had some chicken breasts in the fridge that I needed to use, so I built my meal around that. I opened Tender by Nigel Slater, knowing I'd find exactly what I was looking for, and in fact, I did.

This simple recipe of warm chicken, served over a bed of swiss chard, green beans and tomatoes is as fresh as fresh can be! I didn't open a single jar, or bottle, aside from the olive oil...everything came from the produce department! My first order of business was to get a few pots of water boiling on the stove, and then I set to prepping my ingredients. I purchased rainbow chard, because it's just so pretty, and I separated the leaves from the stems, chopping both in anticipation of cooking. I also trimmed the green beans while the water was beginning to boil.


I finely minced a small shallot, and mixed that with some lemon juice, chopped mint, a pinch of salt and olive oil in a container with a top. I shook it all together until it was emulsified, and set it aside to dress the salad.


As the water in my two pots began to boil, I heated my grill pan and seasoned my chicken breasts. A little salt, a little pepper, and a little chopped rosemary goes a long way! I cooked the chicken quickly, until both sides were golden with wonderful-looking grill marks, but I left it a bit undercooked. Instead, I placed the meat on a plate, and covered it with a bowl to keep the heat in, allowing it to continue cooking as it rested. 


While the chicken rested, I cooked the green beans in one pot, and the chard stems in the other, for about 3 minutes. With 30 seconds left, I added the chard leaves to the pot while I drained the green beans. The beans and the chard (stems and leaves) got tossed in a bowl with the tomatoes, and the dressing I made earlier. At this point, I sliced the chicken breasts into about 4 slices each, and placed them atop the salads, with a bit more dressing. It made for a beautiful plate of healthy, fresh food. Sometimes, it's wonderful to sit down to a summery meal on a cold winter's day, and while I used more wintery vegetables, the resulting dish was bright, light and made me wish for spring!


Now that dinner is done, I can tuck into Chapter 3 of The Professional Chef, and write about that a bit later tonight. 

I also want to remind everyone that there's still time to win a case of Popchips! I've only got one entry so far, and you can't win if you don't enter! Be sure to scroll down to the prior post, entitled Share the Health! and comment in order have a chance at winning! The contest ends on Wednesday night, so be sure to comment ASAP!!

Monday, March 14, 2011

A Little Birdie Told Me...

Tonight, my quails are defrosted and ready to go, so it's time to make Quail with a Spiced Honey Dressing, from Gordon Ramsay's In The Heat of the Kitchen. We're going to use an interesting poached-grilled technique in this recipe, which I've never tried before! The quails will be served on a bed of sauteed potatoes and arugula leaves. I'm looking forward to this!

First thing to do is our mise en place:


The quails are trussed with toothpicks through their legs, to secure them for cooking...ya know, so they don't flail around in there! :) Now, my first step is to get 4 cups of chicken broth boiling with a few thyme sprigs thrown in. I seem to have used all of my fresh thyme, so I threw in some dried stuff instead...it's not ideal, but it works in this case.

It'd look prettier if I had those fresh thyme sprigs!
While I was waiting for the broth to boil, I put some sliced potatoes in a cast iron pan, with some olive oil as well as some salt and pepper. It takes some time to saute potatoes until browned so it's best to start them right away. This recipe doesn't take very long, so putting the potatoes on was one of my first priorities.


Once the broth was boiling, I added the trussed quails to the pot. You only want to cook them for a couple of minutes once the broth is simmering again. After that couple of minutes was up, I pulled them out of the pot with some tongs and patted them dry with some paper towels.


Now that the poaching part of the process is done, it's time to grill them! I put some cooking spray all over a grill pan and placed it on the heat to get warm. While it was heating up, I stuffed each quail with a rosemary sprig and some strips of sliced lime zest. I seasoned each quail with salt and pepper and brushed them with some olive oil.

Now, that's a compromising position!
Meanwhile, I've whisked together a sauce of honey, soy sauce, coarse grain mustard, dijon mustard (I replaced the Dijon mustard with a delicious Champagne Shallot Mustard from Stonewall Kitchen) and roasted sesame oil. I placed the stuffed, poached quails in the grill pan and proceeded to turn them quite often for the next 10 minutes (I think I could have done with a minute or two less, to be honest).


Once the quails were done grilling, I transferred them to a dish. I poured my sauce over and tossed them in the dressing until they were nicely coated. At this point, I let them marinate for about 5 minutes.


After that 5 minutes was up, I plated the potatoes and sprinkled some arugula leaves on top. They started to wilt with the heat of the potatoes, and I used a pair of tongs to place the quails on top. I then drizzled some of the extra sauce on top! Check that out!


All in all, that's about 20 minute of hands-on cooking time. Not bad for a weeknight meal!