Tuesday, May 10, 2011

Mexican "Bistros"

Recently, I've noticed that there are new Mexican restaurants popping up all over the place. These little "bistros" are really exciting for me, because it seems that REAL Mexican food is making its presence known in the New England area. I used to travel to Arizona for work and got the pleasure of frequenting many Southwestern restaurants in the area. Real Mexican food is very different than what you might find at Taco Bell, thank goodness.

mexican food
from Flickr - by D'Contreras

What I find most enjoyable about good Mexican food is that it doesn't weigh you down the way the greasy, Americanized fast-food varieties usually do. In the past, I wrote a review for a new place down the street from my office, Papagayo. That's a great example of fresh, delicious Mexican cuisine.

Tonight, we stopped by another new bistro in the Arlington area, an adorable little storefront called La Posada. We found the menu on the iPhone Safari browser and called in an order. The menu was quite extensive, and it was difficult to pick just one thing. I didn't get pictures of the things we ordered, but I'll assure you that everything looked, smelled and tasted delicious!

Mexican Food
from Flickr - by planetoftheweb

The point of this post, however, is not that we found another delicious little Mexican restaurant to frequent. I wanted to touch on my excitement at a cuisine that hasn't yet made its presence fully known in this area. There's a sushi place on every corner, a Chinese restaurant at each turn, and Thai food abounds, but what about the tableside guacamole carts, and the make your own fajitas? It's about time they make an appearance in our neighborhoods, and our menu drawers. I'm happy to see more quality Mexican food in personable, family-run bistros, with the option of takeout! Gone are the days of giant combo platters of tacos, enchiladas, beans, rice, etc...Goodbye greasy dishes with too much cheese! Welcome to the real Mexican cuisine, and a whole new set of spices and flavors.

Monday, May 9, 2011

Crabcakes Benedict with Mango Cream Sauce

There are few things my husband likes more than crabcakes, so I thought it would be a special treat to add Crabcakes Benedict to the menu this time around. Crabcakes and Benedict...in the same sentence!? Could it get any better than that?

Yes it can ... because mango cream sauce is delicious!

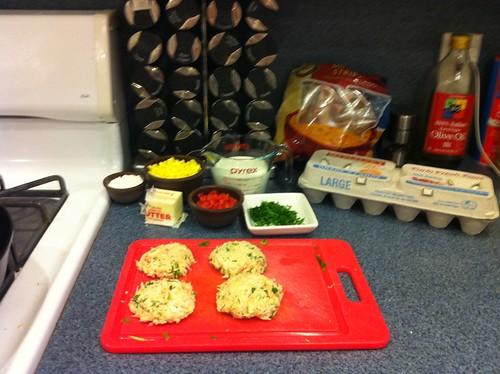
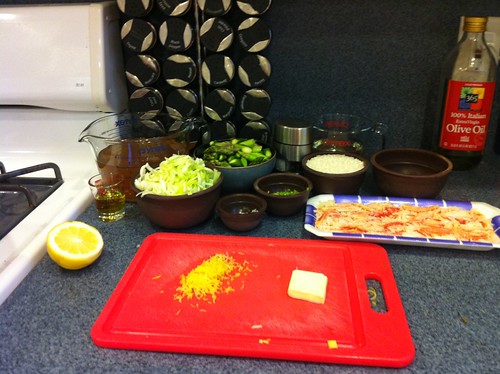
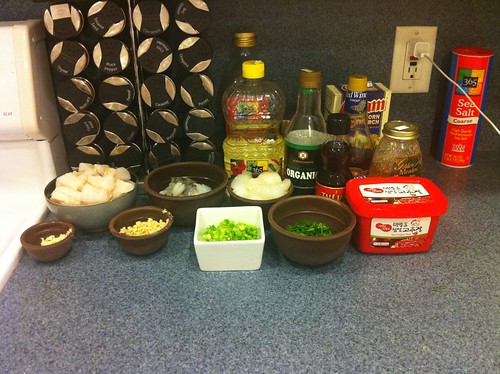
This was a late night to start cooking because we had to take Oia (the puppy) to the vet for her shots...and breakfast for dinner is usually a quicker process than other recipes so this worked out well. I gathered my mise en place

Mango Cream Sauce:
4 tablespoons unsalted butter
2 tablespoons unbleached all-purpose flour
1 cup heavy cream, warmed to room temperature
1 large mango, peeled, pitted, and diced
1/4 cup finely chopped red bell pepper
1/4 cup minced fresh cilantro (I used parsley because "the man" doesn't like cilantro)
salt and freshly ground black pepper

Crabcakes Benedict:
12 large eggs (I used 6, and made the portions appropriate for two)
12 crabcakes (I made 4, using this recipe: click here.)
One 9-ounce bag corn tortilla chips, finely crushed
Olive oil
Salt and freshly ground black pepper
6 English Muffins (I used 2)
2 tablespoons unsalted butter
Chopped fresh flat-leaf parsley for garnish


IMG_0614

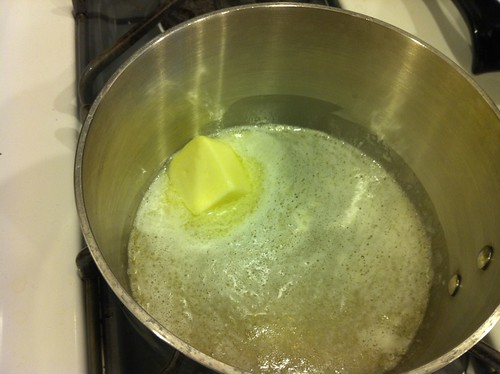
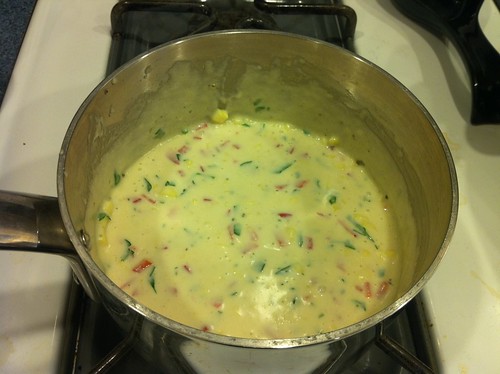
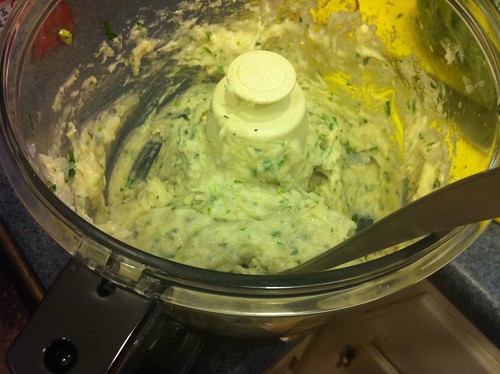
That came together quicker than you'd think. The first thing I did was make the mango cream sauce. In a saucepan, I melted my butter over medium heat. 


IMG_0615

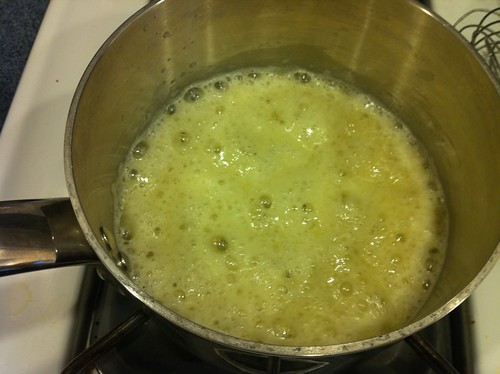
Once the butter has melted completely, whisk in the 2 tablespoons of flour, until the mixture is smooth and fragrant...but does not change color. You don't want it to start browning.


IMG_0616

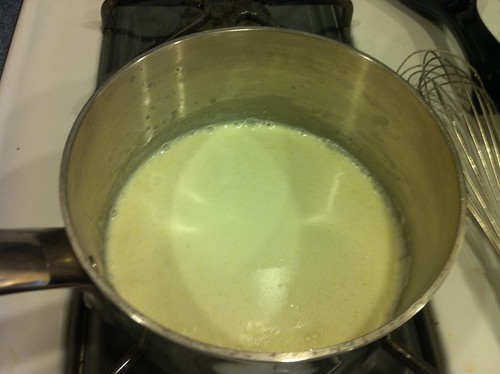
At this point, add the cream and whisk until the mixture is well combined.

IMG_0617

Add half of the mango, as well as the red pepper, cilantro (or parsley), salt and pepper to taste, and then bring the mixture to a simmer. You want the sauce to become thick, yet smooth. The recipe says to simmer for 8-10 minutes but mine was ready much sooner than that, in fact, I'll go far as saying that it was a little too thick. I'd maybe add a little less flour next time.

IMG_0618

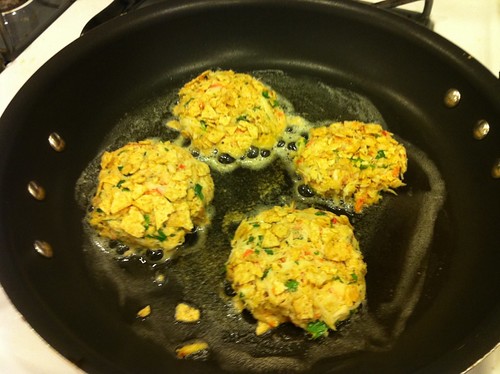
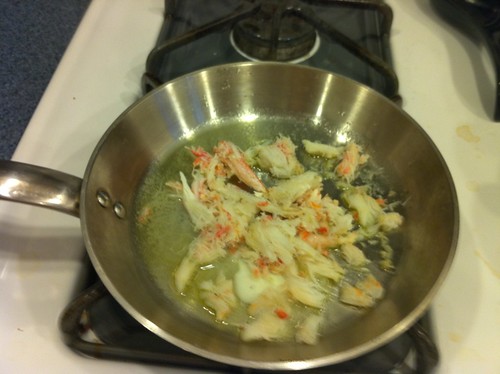
Okay, let's keep the sauce warm while we do the rest of the work. I promise the rest goes pretty quickly. Whisk two eggs in a bowl with a little bit of water, and then brush both sides of each crabcake with the mixture. Coat each cake with the crushed up tortilla chips.

IMG_0619

Heat some oil or butter in a large skillet over medium heat, and once it's heated, add the cakes to the pan. If you decide to make a lot of them, you might need to do this in batches. Because I only made 4 crabcakes, it was fine to do them all at once. Cook them until golden brown on both sides, about 5 minutes per side. I placed them on a paper towel after removing them from the pan to absorb any excess grease that might be sitting on them.

IMG_0620

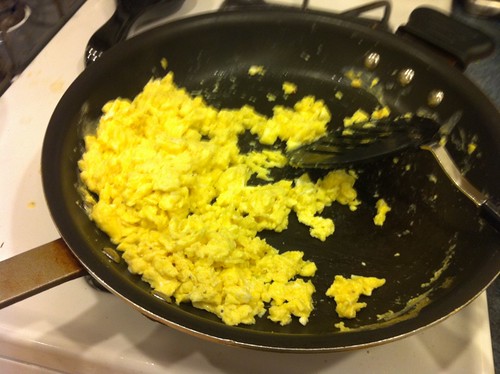
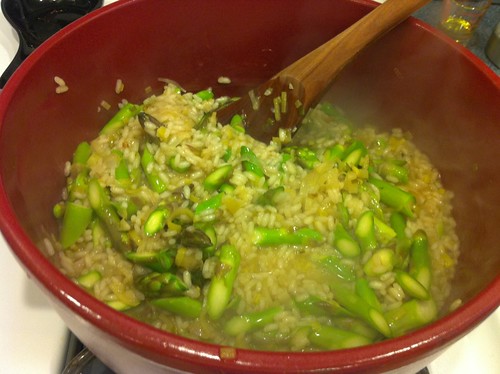
Once the crabcakes are done, whisk up your eggs (in my case, I used 6) and season them with salt and pepper. Wipe your skillet clean with a paper towel and add some new butter to the pan. Once it's melted, pour in your eggs and scramble them.

IMG_0622

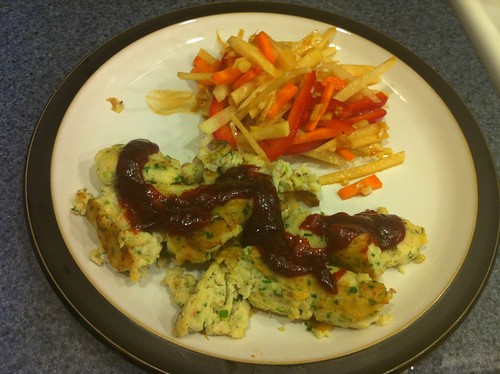
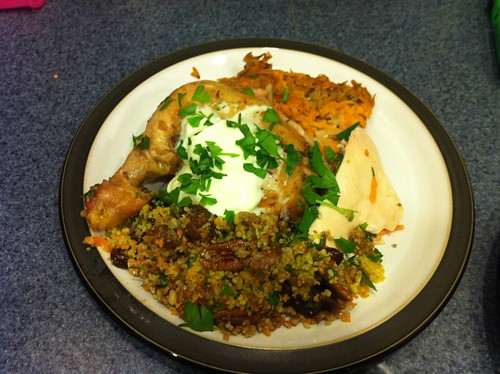
Once all of your working pieces are finished, it's time to plate. Toast your English Muffins and put them on the plate. I gave us each two halves as a serving since it's dinner and not just an appetizer, and I topped each half with a crabcake. Pile some scrambled eggs on top of each crabcake and spoon some of the mango cream sauce on top. Sprinkle each half with the reserved diced mango, as well as some chopped parsley. 

IMG_0623

Dinner fit for the beach! Welcome, Spring, we've been looking forward to your visit!

Friday, May 6, 2011

Risotto Another Way

The other night, I finally got around to taking a trip to H-Mart, my favorite place to buy seafood and fish. I got the ingredients for the sausage I made the other night, as well as the rest of the items on my current menu! Among those ingredients was some nice, fresh snow crab meat. When I got home from work tonight, I was greeted by a happy puppy and a hungry husband, so I got to work in the kitchen! My mise en place came together pretty quickly for this recipe: Crab, Asparagus and Lemon Risotto, from the Stonewall Kitchen Favorites cookbook.

I gathered 3 cups of seafood stock, a bunch of asparagus, olive oil, a leek, salt, freshly ground black pepper, a garlic clove, chopped fresh chives, a cup of Arborio rice, some dry white wine, fresh crabmeat, lemon zest, lemon juice and unsalted butter.

IMG_0598


In a small saucepan, I brought my seafood stock to a simmer, and threw in the ends from my asparagus. I let that cook for about 10 minutes before fishing the stalks out of the stock and tossing them in my garbage bowl.

IMG_0600


In a heavy pot, I heated 1 tablespoon of olive oil until hot, and then added my sliced leek to the pot. For 5 minutes, I allowed the leeks to cook, stirring frequently.

IMG_0601


Once the 5 minutes was up, I seasoned the leeks with salt and pepper, and added the minced garlic clove, as well as the chopped chives and allowed it to cook for 30 more seconds. Then, I added the Arborio rice, and allowed the mixture to cook for another 2 to 3 minutes.

IMG_0602


Does this all look familiar? It should, because we've made risotto before. You guys should be pros by now! :) Once the 3 minutes were up, I added half of the wine, stirring until the liquid was fully absorbed. At that point, I added the other half of the wine and allowed it to do the same thing. Continue this way with the seafood stock until the risotto is almost done and you have about 1/2 a cup of stock in reserve.

IMG_0603


Add the last 1/2 cup of stock along with the asparagus pieces, and allow it to cook for 4 to 5 minutes.

IMG_0604


Stir in 3/4 of the crabmeat, the lemon zest and lemon juice and season with salt and pepper again. Allow everything to warm through.

IMG_0605


Be sure not to leave this on the heat TOO long and over cook the already cooked crab, but definitely give it time to heat through. Meanwhile, take a small saute pan and add 1/2 tablespoon of olive oil and a teaspoon of unsalted butter. Once that has melted and heated together, add the rest of the crab meat and allow to heat through, stirring to coat. Season this as well, with salt and pepper.

IMG_0606


To plate, spoon a nice helping of the risotto onto each plate or bowl and then top with the extra buttered crabmeat. Sprinkle with the rest of the chopped chives and serve. This is a really fresh, spring dish that really showcases asparagus during their season. The addition of crab is a bonus...you could do this recipe without the crab as well, should you have trouble finding the ingredient, or want to cut back on the cost of this dish!

IMG_0607

Thursday, May 5, 2011

Happy Cinco de Mayo!

In honor of the fifth of May, I will leave you with a recipe for a classic Cinco de Mayo staple: the Margarita!

Margarita
from Flickr - by Drunken Monkey

A recipe for REAL margaritas, from the food network:

1 lime, halved
Kosher salt
1/2 cup freshly squeezed lime juice (about 5 limes)
2 tablespoons freshly squeezed lemon juice (about 1 lemon)
1 cup Triple Sec
3 cups ice
1 cup white tequila

If you like margaritas served in a glass with salt, rub the outside rims of 6 glasses with a cut lime and dip each glass lightly into a plate of kosher salt.

Combine the lime juice, lemon juice, Triple Sec, and ice in a blender and puree until completely blended. Add the tequila and puree for 2 seconds more. Serve over ice.

If you prefer frozen margaritas, halve each of the ingredients, double the ice and blend in two batches. Serve with a cut lime.

Salud!


Wednesday, May 4, 2011

Disaster Ensues!

I took tonight's recipe from the Top Chef Cookbook. I had been looking forward to Sea Bass, Scallop and Shrimp Sausage with Jicama Slaw, Sweet Chili Glaze and Asian Chimichurri all day. Things did not turn out the way I had planned, unfortunately! Let's take a look at where things went wrong!

Warning: Once things went downhill, the camera got pushed to the side, so I apologize!


The dinner started out like any other...with a mise en place. The link for the recipe can be found above so I'll give you a run down of the exact ingredient measurements:

For the Sausage:
1 pound Corvina or any other sea bass fillet, cut into 1-inch pieces (I used cod, actually)
1/2 pound of black tiger shrimp, peeled and deveined
1/2 pound scallops
1 garlic clove, minced
One 1-inch piece of fresh ginger, peeled and minced
4 scallions, finely chopped
1 bunch fresh cilantro, stemmed and chopped (I used parsley because Matt hates cilantro)
1/2 cup vegetable oil
1 teaspoon sesame oil
2 teaspoons red wine vinegar
2 teaspoons soy sauce
salt and freshly ground black pepper to taste

IMG_0590


I put the fish, shrimp and scallops into my food processor and pulsed until it was a smooth mixture. Adding the rest of the ingredients in the above list, I continued to pulse until well combined. 

IMG_0591

At this point, I cut a small corner off of a zip lock bag and started to spoon the mixture into the bag. I would be using it like a piping bag. For each sausage, I laid out a 12-inch piece of plastic wrap on my work service, and piped a 1-inch in diameter, 6-inch in length line down the center. I then rolled it up to create my sausages.

IMG_0592

So far so good, right!? Okay, I put a pot of water on to boil and started in on my Sweet Chili Glaze. You'll need:

1/2 cup sambal chili paste, or more to taste (I used Korean red pepper paste)
1/2 cup honey, or more to taste
1/4 cup red wine vinegar
2 teaspoons cornstarch

In a small saucepan, combine the chili paste, honey and red wine vinegar and bring it to a boil. In a separate cup, stir together the cornstarch and 2 teaspoons of water, stirring until smooth. Once your mixture is boiling, add the water and cornstarch and boil for 3 minutes. If the glaze is too spicy, you can add more honey to it, and if the glaze isn't spicy enough for ya, you can always add more chili paste. Here's the beginning and end images of this process:


IMG_0593


IMG_0594

Now that my water is boiling, I can add my sausages to the water. They should be in there for 6-8 minutes, until they are firm to the touch. Because mine didn't really seem firm to the touch after 8 minutes, I left them in a little longer. 

So, I let them cook for a few more minutes, and then spooned them into the ice bath as the recipe describes. The sausages seemed to be a bit broken apart within their plastic wrap casings but I allowed them to rest in there for a few minutes while I prepared the jicama slaw and dressing. For that I needed:

1 small jicama, peeled
1 small red bell pepper, cored and seeded
1 carrot
1/2 bunch fresh cilantro, stemmed and chopped (I left that out again)

Dressing:
1/2 shallot
1/2 cup peeled chopped fresh ginger
1/2 bunch fresh cilantro, stemmed (left out)
1/4 cup sriacha hot sauce
2 teaspoons soy sauce
1 teaspoon sesame oil
1/4 cup red wine vinegar
3/4 cup vegetable oil

I julienned the carrot, jicama and red bell pepper and put them in a large bowl. In a smaller bowl, I added all of the ingredients for the dressing and whisked them up. I just realized I was supposed to actually blend them all together in a food processor, but I thought it was really good with the chunkier version. Mixing it into the julienned veggies, I was relieved to see how quickly this slaw came together! 


IMG_0596

Here's where things went terribly wrong! I heated up my grill pan in anticipation of grilling my sausages.  I went to the bowl of ice water to unwrap my sausages but alas, it seems they had either burst through in parts of the plastic, or opened so that the water had seeped inside of the plastic. So what I had were a bunch of PIECES of soggy sausage, crumbling all over my grill pan! As I moped around the kitchen, trying my hardest to piece together the sausages enough to resemble their form, they started to brown in the grill pan. They smelled delicious, they just didn't really LOOK very appetizing. I'm sorry that I have no photos - this was no time for a camera!

When I had deduced that the sausages were warmed through and browned to my satisfaction, I plated the slaw and placed the "sausages" on top and to the side. I drizzled it with the Sweet Chili Glaze, and voila...a poor representation of a delicious meal! I'm trying this one again, I swear it!


IMG_0597

Monday, May 2, 2011

Sharing is Caring!

When I get a new cookbook, I love to tell my friends, co-workers, family...well, everyone I know, about the wonderful recipes found within! And I'm definitely one to share my recipes! Very often, I will trek into my office with an extra bag holding an over-sized, hardcover cookbook that I just had to share with my co-workers.

Recipe Binders
from Flickr - not quite vintage

Recipe exchanges are a great way to try new things, make new friends, and expand your culinary horizons. Start conversations at the coffee maker or the water cooler, and tell people about that last great recipe you tried. It's a guaranteed icebreaker!

Another fun way to learn about new recipes is to trade your cookbooks. There is a site, called Swap.com, where you can trade your books and other media for new-to-you items. All you pay is the shipping, and you can even print the shipping label from the site. Make a list of items you have, and then make a list of items you want...as fair trades become available, you'll receive emails about those trades. It's a great way to get a new cookbook when you are done with an old one. I have my favorites that I will never get rid of, but sometimes I find myself tiring of a certain book, and then I'll trade it for another one!

Real Food Montage
from Flickr - by passepart0ut

Spread the love, share the wealth and exchange your recipes with friends, co-workers and family. It's a great way to make new friends, bond on another level with old friends and family, and expand your culinary knowledge exponentially.

Friday, April 29, 2011

Sweet Potatoes!

Tonight, I made a down-home, rustic dish from Jamie's Kitchen, by Jamie Oliver. I thought it was only fitting to make something from a notably British chef on the day that the Royal Family welcomes their newest Princess! This dish is a roasted chicken, stuffed with fragrant couscous and cooked on a sweet potato stovie.

There's a lot of moving parts in this one, and they all come together to cook for an hour and a half...so once you put everything in the oven, you are free to do what you please while it cooks. It's a very hands-on/very hands-off process, is what it is! :)

For my mise en place, I gathered some tri-colored couscous (because I think it's prettier than regular), the zest and juice of one orange and one lemon (reserving on lemon half after juicing), some mixed dried fruit, some mixed nuts, chopped mint and parsley, olive oil, potatoes, sweet potatoes, fennel seeds, coriander seeds, ground cinnamon, cumin seeds, cardamom pods, black peppercorns, sea salt, creme fraiche, and of course, a roasting chicken.

IMG_0568


Once your mise en place is in place, I promise that things pick up speed...so let's take it away!

Preheat the oven to 375 degrees. Mix the couscous, zest and juices of both orange and lemon, the dried fruits, mixed nuts and fresh herbs in a bowl and add a few good glugs of olive oil, as well as some warm water, and stir everything together until blended.

IMG_0569


Grate the potatoes (both regular and sweet) into another bowl. I found that using the grating disc on my food processor was MUCH quicker than grating by hand!

IMG_0570


In a mortar and pestle, mix all the spices together into a fine powder.

IMG_0571


Alright, now it's time to get cookin'!

Stuff the chicken with the fragrant couscous and really pack it in there. Once you've gotten as much as you can in there, cap it with that reserved lemon half.

IMG_0572


IMG_0573


Once the chicken is stuffed, rub some olive oil over the whole chicken and use half of the spice mixture to rub the skin all over.

IMG_0574


Using a large casserole dish, or roasting pan, spread your grated potatoes across the bottom and really pack them in there. You want to make a sort of potato cake in the pan. Once all of the potatoes have been pressed down in there, like a little bed for our chicken, place it on top and put it in the oven. After a half an hour has passed, turn the temperature down to 325 degrees and cook for another hour.

IMG_0575


The whole house smelled so fragrant while this dish was cooking, just mouth-watering! Once the hour and a half was up, I pulled the pan out of the oven and allowed the chicken to rest for about 5 minutes before serving.

IMG_0576


Once the resting was done, I carved the chicken and cut squares of potato "stovie" and plated with some of the stuffed couscous on the side. Topped with a bit of creme fraiche, as well as some sprinkled parsley, this dish was so home-y and heartwarming! And now, to watch the wedding!

IMG_0577