Showing posts with label steamers. Show all posts

Tuesday, July 17, 2012

The Swing of Things

I've been at home, recuperating from my foot surgery, and I've really missed writing this blog, and most of all, cooking! We were down to a little bit of nothing in the fridge, in the way of proteins, and have been subsisting on take-out. My husband doesn't cook very often, and it's been quite an effort to stand in the kitchen and prep ingredients, so take-out was the solution. I think we exhausted about all of our options by the time I was ready to pull a list together and get some food in the house! Finally, last night, Peapod delivered, and our fridge is again stocked with delicious, fresh ingredients, and there's a menu hanging on the door. Ah, getting back into the swing of things now!

I decided to start off simple, with meals that don't take a ton of time, or prep...and best of all, clean up easily. I still have to take it easy on my foot, although I can walk on it, so short stints in the kitchen are best. For my first trick, Asari Sakamushi (Steamed Clams with Soy, Butter and Garlic) with a side of Thai-Style Brussels Sprouts. This meal took a total of about 20 minutes, with only about 8 minutes of actual cooking time, between the two dishes. It was so simple to pull together, totally delicious, and great for a hot summer's evening.

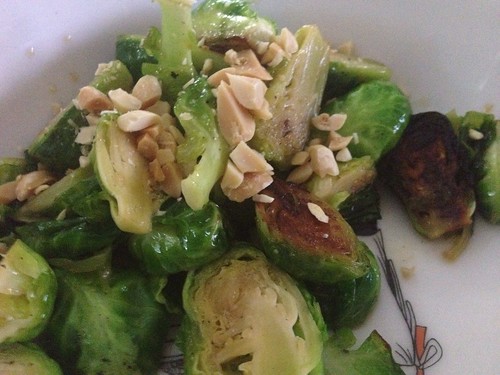
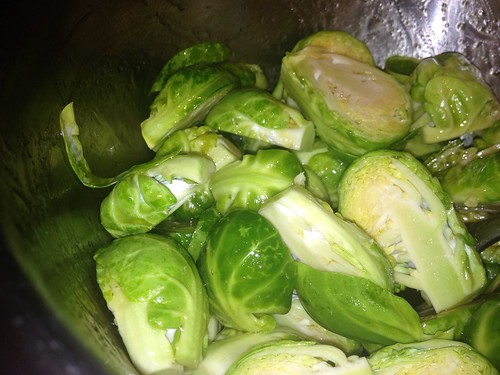
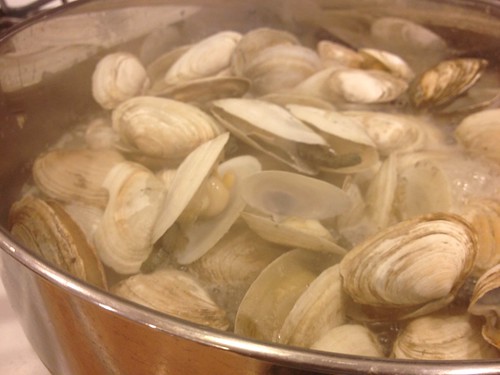
Between the two recipes, there were a total of 11 ingredients, which is great because I could pull everything out without too many trips to the pantry and fridge from my workspace near the stove. I gathered my bottles of olive oil, fish sauce, sake, and soy sauce, and then grabbed some roasted peanuts, garlic cloves, butter, scallions and a lemon. I had unpacked the groceries and left my Brussels sprouts and clams on the counter already so now I was ready to start! Instead of the Manila clams suggested in the recipe, I purchased about 3 pounds of steamers - they were on sale, and they are my favorite! I washed them in some cold water to remove a lot of the grit and set them aside. I trimmed, groomed, and halved my Brussels sprouts too, placing them in a bowl with the olive oil and fish sauce to marinate for a few minutes. That was the extent of the prep, aside from a little chopped garlic!

Untitled

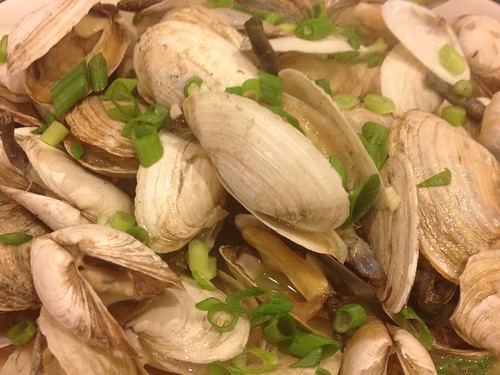
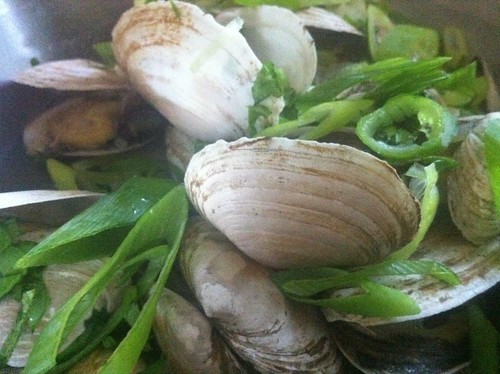
At the same time, I heated a cast iron skillet over medium-high heat, and also brought the sake and garlic to a boil in a separate deep-walled pan. I definitely had more than 30 clams so I wanted to make sure there was a lot of room for them to open. I placed the Brussels sprouts halved-side down into the cast iron skillet, and left them to caramelize while I tended to my clams. Once the sake was simmering, I poured those clams into the pan and covered them, leaving them to steam for the next 5 minutes. I don't think I've ever steamed clams in a pot with a clear cover before, and I have to stay that it was very cool to actually watch them cooking, and slowly opening. Maybe it's just been too long since I cooked a meal...but I was intrigued!

Untitled

As the clams finished cooking, it was also time to stir the brussels sprouts and get the other side a bit more browned. I stirred them up, and then removed the clams from the pan with a slotted spoon. In place of the clams, I added some soy sauce, lemon juice, and butter to the pan, allowing it all to meld and get deliciously luxurious and silky, just two or three minutes longer. I poured it all over the clams, sprinkled some sliced scallions on top, and voila...dinner is served!

Untitled

Untitled

We ended up baking a loaf of frozen bread towards the end of our dinner, because there was so much delicious broth left over that we couldn't waste! I didn't think we'd need it with all the clams, but, it was too good to just pour down the drain. YUM!!

Monday, July 18, 2011

First Cukes, Now Zukes!

My friend Laurie brought me a few gorgeous zucchini from her garden, in exchange for a post on how to make fried zucchini sticks. Now, that's my kinda trade! I decided to serve them with some steamers, cooked in beer and shallots, and sprinkled with a chiffonade of arugula as well as some scallions. I love steamers on a hot summer day, and these were no exception. I could have eaten another two pounds!

IMG_0832


Okay, so the steamers are delicious - and I could go on all day about them, but this post is about zucchini, and amazingly fresh zucchini at that! The recipe I used was loosely based on a Giada de Laurentiis recipe from foodnetwork.com, but I just kind of threw stuff together - no measurements this time around. For the breading, I mixed together some panko, grated parmesan and salt. Taste it to make sure it's seasoned correctly, but you won't need a ton of salt since parmesan is quite a salty cheese. In a separate bowl, crack and beat two eggs. The zucchini should be cut into 3-inch pieces that are about 1/2-an-inch thick.

IMG_0827


This is a bit time consuming but don't rush, because you want each zucchini stick to be nicely coated. Dip it into the egg and soak it thoroughly, and then allow the excess to drip off before dunking it into the panko/parmesan mixture. Try to get it buried in there and pat the coating all over each piece. Once a piece is ready to go, place it on a baking sheet while it waits to be fried to a wonderful crisp! Keep going like this until all the pieces are finished. If your hands get all "gloopy," rinse your fingers off to avoid thickening the egg wash.

IMG_0828


Once you are ready to fry, heat some olive oil or vegetable oil in a pot and allow it to heat until it fries a small piece of "test panko." I just took a little clump of egg and panko, threw it in the oil, and waited to see if it started to fry immediately. It takes a few minutes for the oil to heat up so don't rush it - if you rush it, you're going to get soggy, doughy zucchini sticks, and that...is not...appetizing. Once the oil is heated, fry your zucchini sticks in several batches, depending on the size of your pan.

I did about 5 at a time because I used a small pan. The larger the pan, the more you can do at one time. Once they are crisp and browned, about 2-3 minutes, you can remove them from the oil with a slotted spoon and allow them to drain on some paper towels. Serve fairly quickly so that they don't have time to cool completely...the cooler they are, the soggier they get, but when they are hot, boy are they crispy!!

IMG_0830


I sprinkled them with a bit more parmesan, and served them alongside the steamers. You could serve them with a ranch dressing dipping sauce, or even give them an extra kick by adding some crushed red pepper flakes to the panko/parmesan mixture. Get creative with it! As long as your oil is hot, and you fry them for the right amount of time, you've got a wonderful side dish for an easy summer meal!

Wednesday, June 8, 2011

Steamer Clams and an Artichoke!

We're going to do things a little differently today. I don't have a "mise en place" picture to start off this post, because the recipe didn't really call for any prep work - amazing right? It was more measuring and combining, stirring and dipping...so that's exactly what I did. The recipe, "World's Best Fried Clams," comes from the Stonewall Kitchen Harvest cookbook. The menu mentions pairing these clams with a frisee and spring ramps salad, which I was really excited to try, but alas, I couldn't find either frisee lettuce OR ramps (I think I just missed the season for those) at the store. So instead, we had some more of those beautiful Globe Artichokes from Whole Foods ... STILL on sale!!
Stonewall Kitchen Harvest: Celebrating the Bounty of the Seasons
I don't know if I can commit to the title of this recipe, because I've had some pretty good fried clams in my day, but these were REALLY good, and I'll place them up there at the top, at the very least. While the recipe called for shucked steamer clams, I actually just bought a bag of shelled ones, and shucked them myself. I think it was probably much cheaper that way, and it's not difficult to get them out of their shells. You just need to come to terms with the fact that you are killing them as you do it. I know, I know...but I love raw oysters, and you do the same thing when you shuck those, so I've become a bit more heartless about the whole thing. Don't judge me! :)

So, I shucked the steamer clams and placed them in a bath of whole milk. They stayed there until I was ready to fry them, just soakin' it in! In another bowl, I beat an egg, and mixed it with a 1/2 cup of buttermilk, 3/4 cup of cornmeal, 1/4 cup of all purpose flour, some salt, some pepper, and a few splashes of hot sauce, such as Tabasco.

IMG_0698


IMG_0699


I poured an entire bottle of canola oil into a cast iron pan and set it to heat. I used little drops of leftover batter to test the oil. When the drop of batter bubbled and floated to the surface quickly, it was time to fry those clams! That's always a good way to test your oil, with a small amount of whatever you are frying...then you'll know if the heat is correct for that specific ingredient. Once the oil was ready for frying, I transferred the clams from the milk bath to the buttermilk batter and let them swim around for a minute...coating them thoroughly.

IMG_0702


Frying the clams in batches, let them cook for about 2 minutes, and then spoon them out to a paper towel. I only did about 8 or 9 of them at a time, so it took a few batches to get them all cooked, but you get a more even fry if they aren't over-crowded and touching each other.

IMG_0703


IMG_0704


I threw together the ingredients for a tartar sauce: mayonnaise, capers, parsley, lemon juice, chopped cornichons, scallions, salt, pepper and a dash of hot sauce. That made a great dipping sauce for the clams. I also poured a little bowl of that Lemon-Tarragon Vinaigrette from the other day to use as a dipping sauce for the artichokes.

IMG_0701


This meal was very refreshing, and worked perfectly for a hot evening such as this. It was light, yet filling, and totally easy to pull together. 

IMG_0705